10 REASONS WHY YOUR NEXT LISTING NEEDS A FLOOR PLAN
Thinking of listing a home without a floor plan? Think again! Floor plans have been shown to generate more interest in a property. Here are 10 top reasons why it is essential to use a floor plan on your next listing.
Pro's of using a floor plan
1) 1 out of 5 buyers would disregard a property with no floor plan or would only revisit after exhausting their choices. (Rightmove, 2013)
2) 1 out of 10 buyers would never schedule a visit without seeing the floor plan prior. (Rightmove, 2013)
3) Buyers indicated that floor plans were the best way to see the room layout, coordination of rooms, and general flow of the property’s spaces. (Rightmove, 2013)
4) Floor plans increase a brand-new home’s appeal by 24%. (Zillow, 2016)
5) 64% of home buyers are interested in viewing floor plans (Zillow, 2016).
6) 51% who used the internet in in their home purchase found floor plans very useful. (National Association of Realtors, 2018)
7) According to Property Academy’s 2015 survey, 81% of home buyers found floor plans useful or essential when searching for new property. (Rightmove, 2017)
8) 78% of sellers rated the importance of floor plans as 7/10 or higher. (JW Wood, 2013)
9) Get ahead of your competition! In May 2016, only 18% of listings on Rightmove had floor plans. (Metropix, 2016)
10) According to Zillow’s 2016 Consumer Housing Trends, “having a floor plan or layout that meets their [buyers] needs is just as important as having their preferred size/square footage.” (Zillow, 2016)
“Why do buyers want to see floor plans?”
A floor plan is your key to generating more leads and increasing buyer interest. This visual implement will help potential buyers visualize and get a feel of the property’s spaces without or prior visiting the place. Your floor plans are useful in the following ways:
- They are more specific than photos if measurements are included;
- They are extremely useful in asking for estimates on home furnishing supplies; and
- They are nifty in stimulating remodeling ideas for potential buyers.

“I can see the benefit of including a floor plan but I'm just too busy to measure one. What options do I have?”
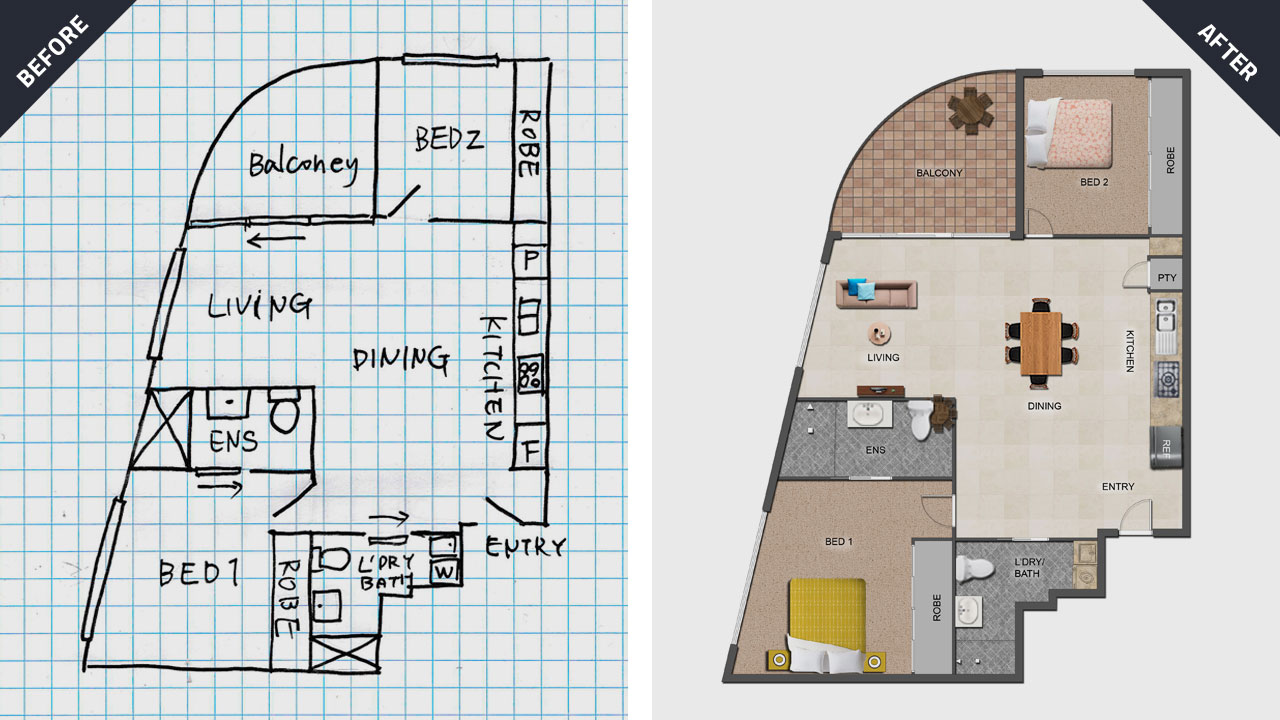
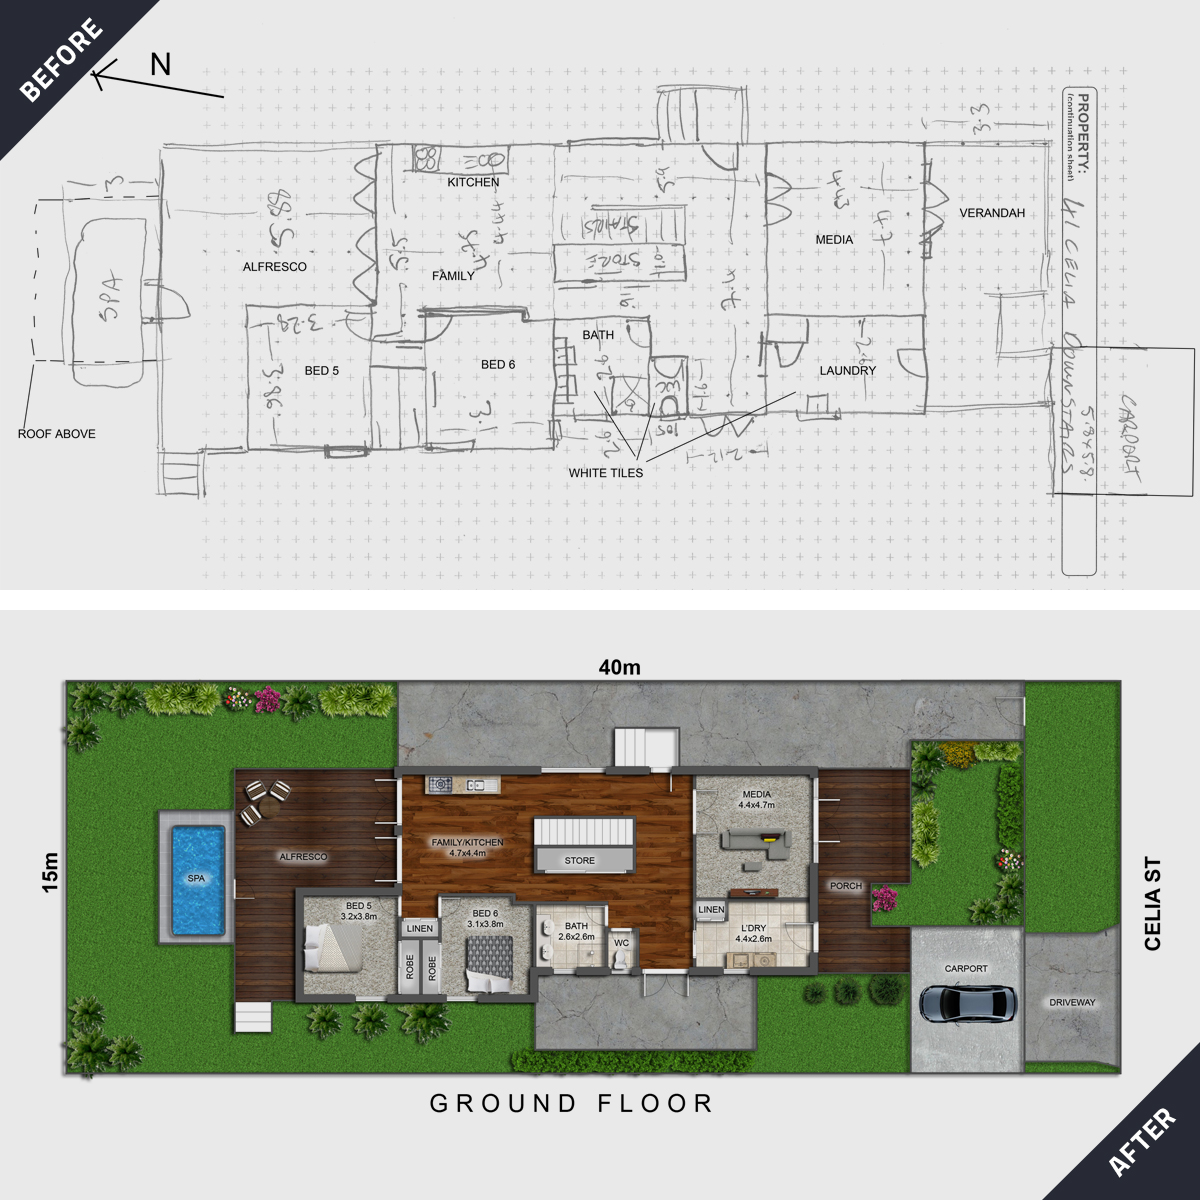
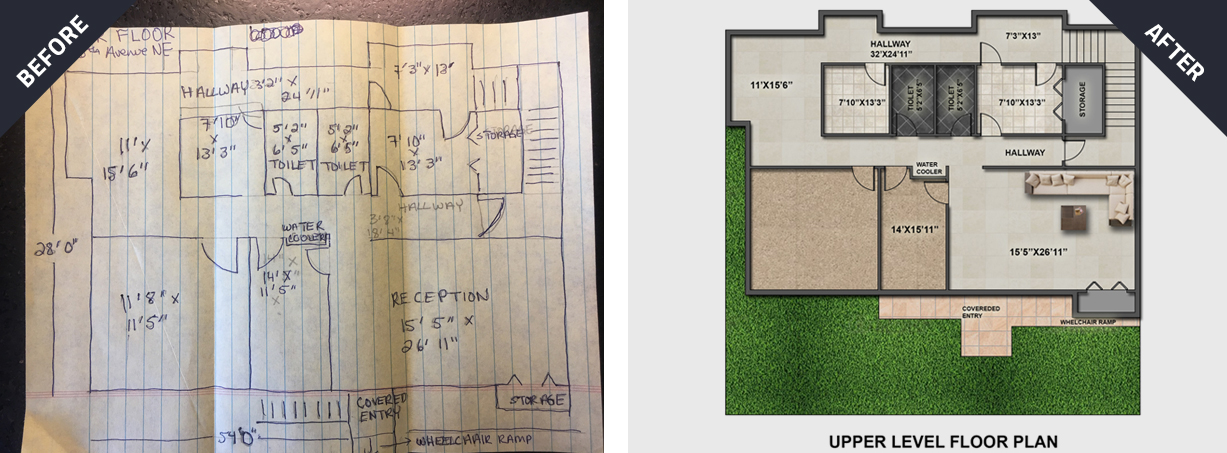
Simply draw a rough sketch of your floor plan with notes and send it into our team. We’ll produce a professional floor plan for you under 24 hours. We’ll ensure to add a disclaimer that states the floor plan is indicative only and not to scale.
Simply visit here and upload your file in our floor plan edit tab and choose the kind of floor plan you want.
“What if I want to measure a floor plan accurately? How do I do this?"
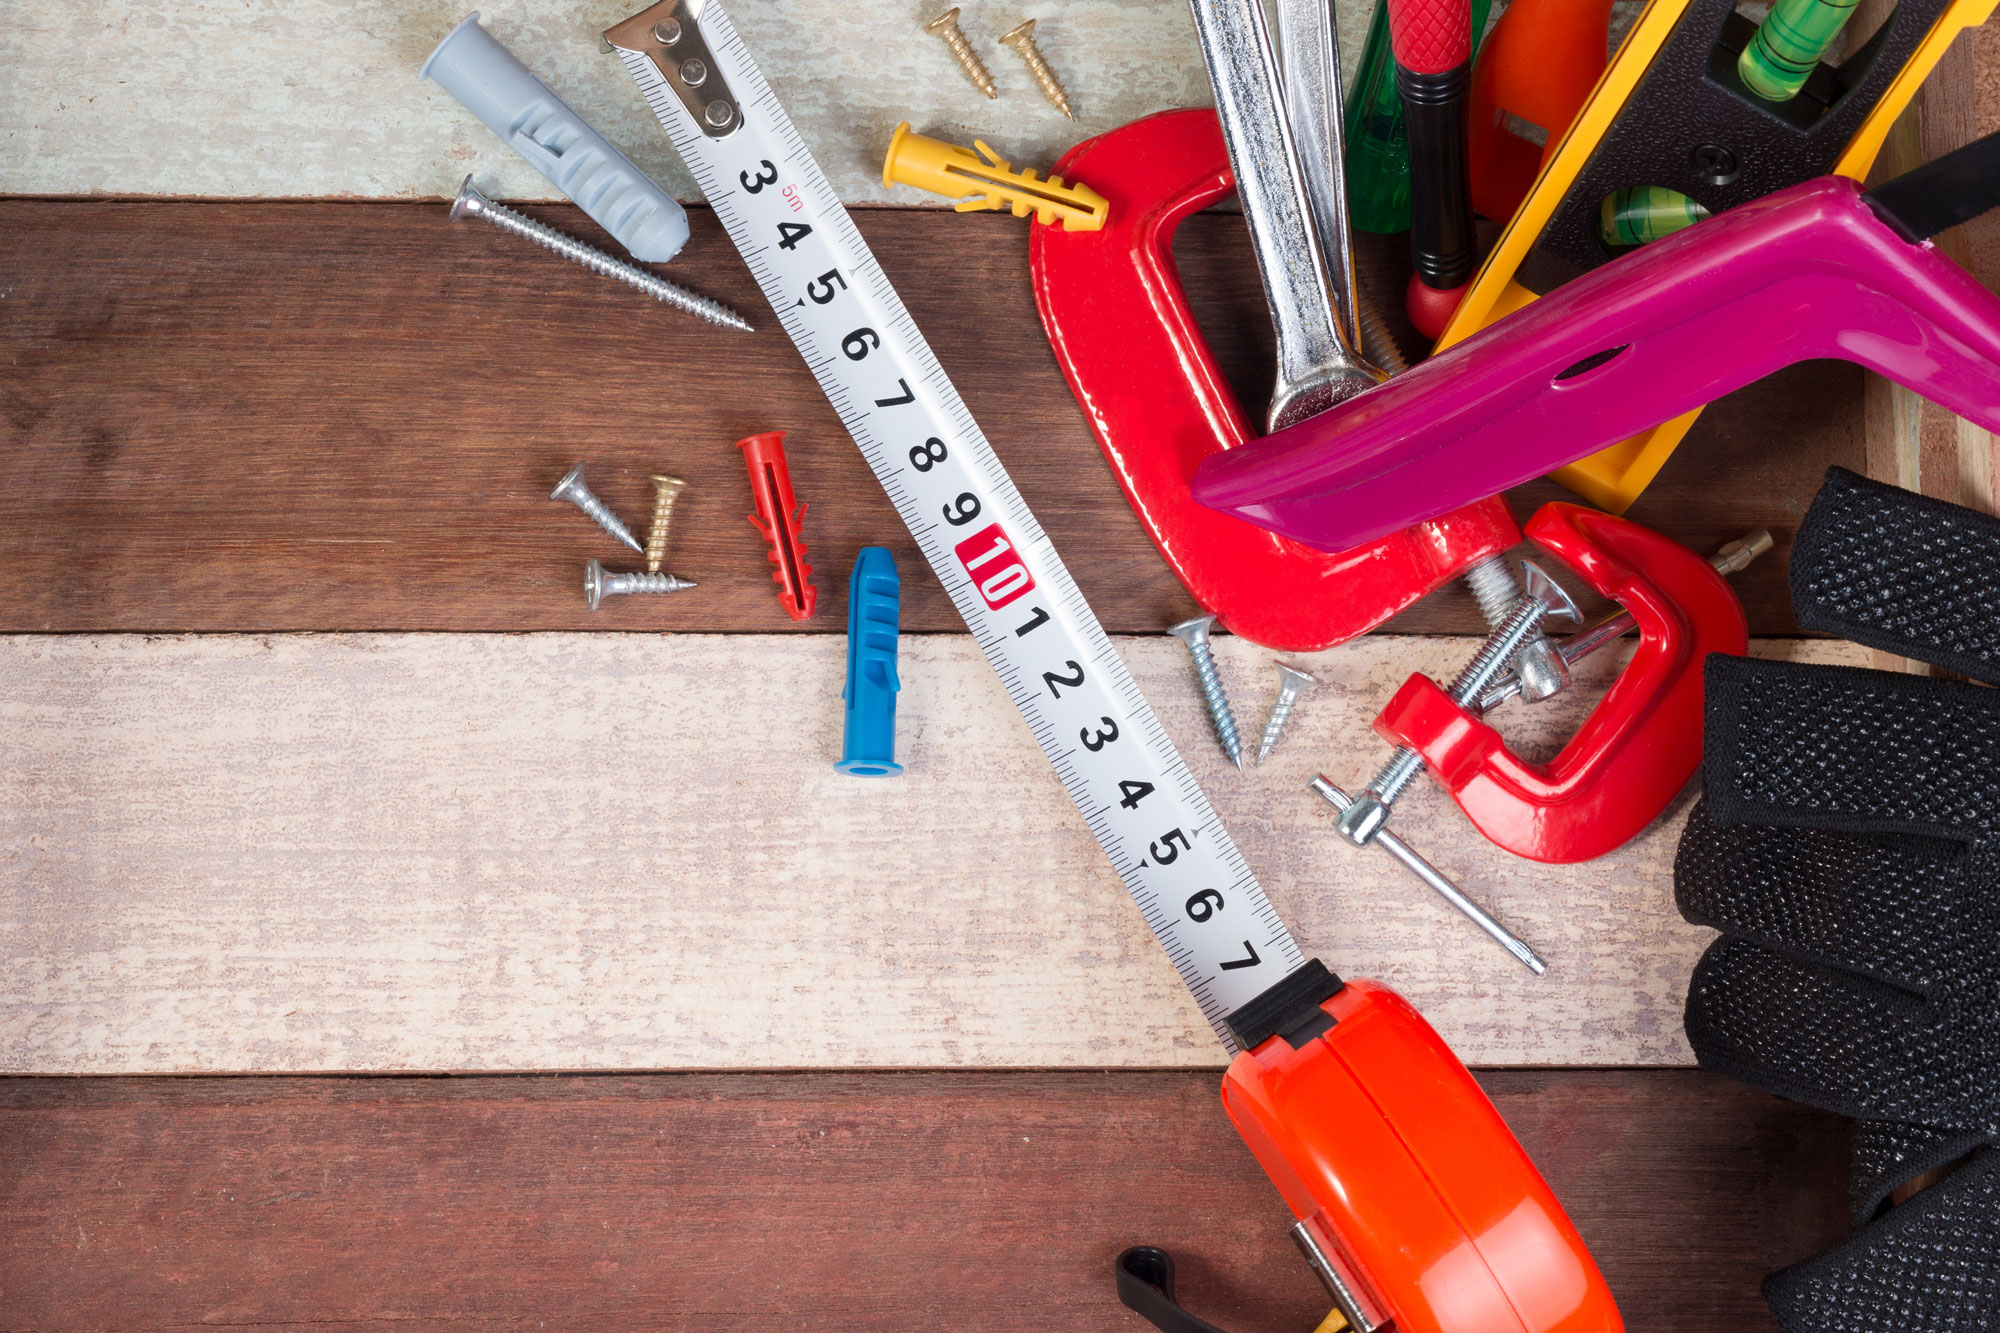
Secure these following materials and equipment in preparing your professional floor plan kit:
- Bosch laser measurer (laser measuring device Bosch PLR 501 or similar units; a practical US$120 investment found on eBay!)
- Measuring tape (cheaper alternative to Bosch; only US$20 on eBay2)
- Graph paper
- Clipboard
- Pencils with erasers and sharpeners
- Pens in different colors
- Small ruler
- Clear sticky tape and dispenser
- Highlighters
- Pencil case or pouch to collect your sketching materials
PRO TIP #1: Drawing floor plans can be tricky and difficult for beginners. We find it handy to invest on a fold up card table to avoid drawing your plans on just a clipboard or cold harsh floor. It’s a sound investment for your floor plan kit and can double as your regular table.
“Where do I begin with my floor plan?”
Making your floor plans will need enough time and practice especially with the measurements. Let’s help you get started with these easy steps.
Identify the Area
New properties usually have floor plans; old ones may need some updating. If you’re creating one for a planned property or one that’s being remodeled, it’s best to identify your area to know the spaces to be included. Know how many rooms and bath should be there and where they should be placed.
PRO TIP #2: Ask property owners if they’ve managed to keep their floor plan. With luck, you can simply create a new one based on their existing plan and ask for any improvements to add. You can recreate the floor plan and make the changes there following the improvements. Otherwise, you’re good to go with their measurements.

Decide on the Level of Accuracy
If you simply wish for buyers to visualize the interior area, you can opt for a less accurate floor plan. However, this would only serve as an approximate display. For a more professional and exact visual representation, go for a more accurately scaled floor plan.
Your floor plan should clearly present the following:
- General layout of the property
- Orientation (direction and appearance)
- Property’s size
- Room dimensions and areas
Fixtures
PRO TIP #3: Use your smartphone’s compass to know the property’s directional orientation. Including this will help buyers understand the positioning of the property’s rooms, entryways, gardens, and parking space or garage.
Accurately measured sketches produce more accurately edited versions. Nitpicking can be common in the real estate industry, don’t let measurements be the hiccup to your sales.
PRO TIP #4: For beginners, stick to simpler designs; designer homes and buildings may have tricky angles that’s difficult to measure and draw. Start your way bottom-up to ease into the learning curve.
Scale your Measurements Down
Scaling your floor plans in paper is important because it’s easier to visualize and is more convenient and cheaper than 1:1 scales.
- Set scale measurements to 1 meter = 1 square before your on-site visit. This way you’ll easily fit your sketches in your graph paper and lessen smudges as opposed to post-sketching measurement plans.
- Use Google Earth or Street View. Thanks to Google Earth you’ll be able to access aerial views of the properties in your listing. From there, you can look for each property’s address and use the images as bases for precise floor or site plan outlines and orientations.
- Use the longer side of the graph paper to accommodate the longest side of the sketch. This will help you save time from adjusting to the space and more time drafting.
Note: Your card table will definitely come in handy during on-site sketching.
Learn Floor Plan Symbols
Your floor plans wouldn’t be complete without the use of proper symbols. At BoxBrownie.com, we use the following:
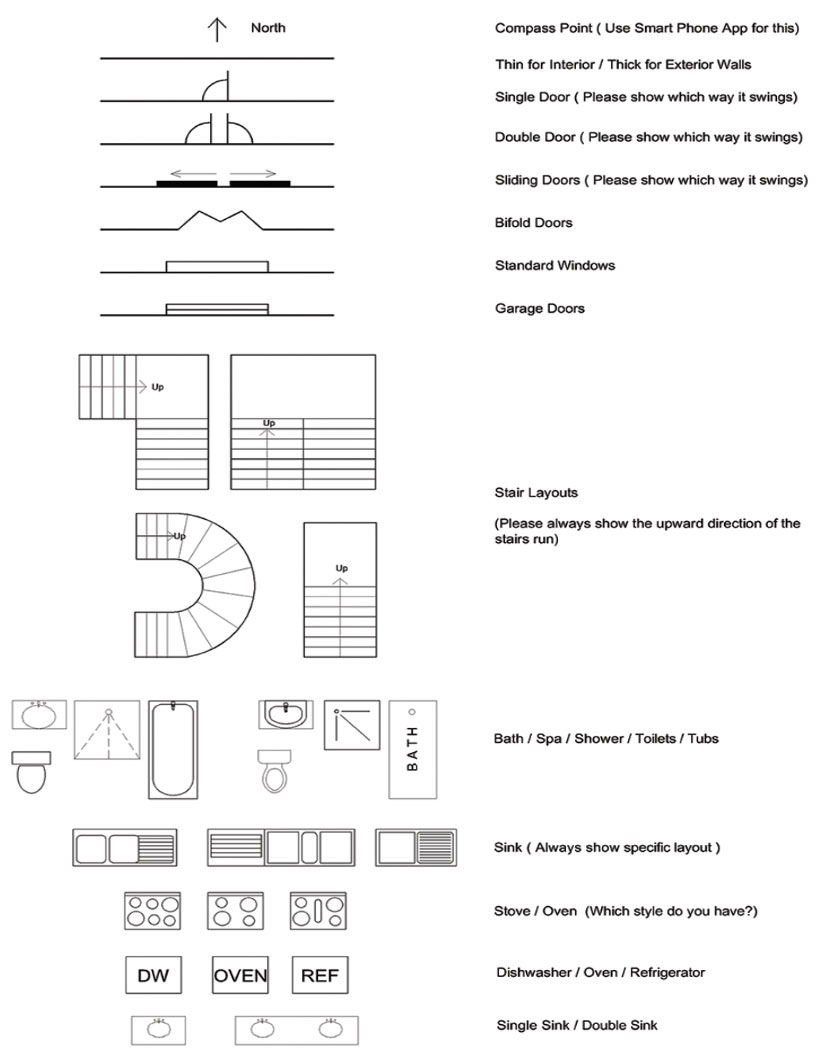
Label Rooms Clearly
Floor plans can help your listing stand out, especially one complete with clear labels. This way, your buyers will spend less time understanding the schematics, and more time inspecting and picturing themselves in the rooms and overall area.
PRO TIP #5: Not everyone can understand floor plan symbols, you can add the legend for the symbols along with the floor plan in the listing so potential buyers can easily understand the layout.
<insert couple looking at floor plans pic>
On-site Checklist:

It’s best to prepare your on-site checklist before your visit to the property to run through details. Scan the list again after your measurements and drafting to check for loose ends.
- Precise and harmonious general layout
Does the layout reflect the actual property? Does it present smooth and coordinated flow of areas?
- Clear, descriptive floor plan
Rule of thumb: someone who hasn’t seen the property must be able to understand your floor plan. Make sure it’s legible so it’s easy on the eyes and can be easily recreated and enhanced digitally. If in doubt, ask someone to take a look.
- Correctly labelled areas and rooms
Are all the areas correctly labelled? This should include the bed, bath, and living rooms; kitchen and pantry; utility closets; patio; swimming pool; lounge; and garage or parking space.
- Include 2-4 measurements each room
Another rule of thumb is taking at least two (2) room measurements - four (4) ideally. The more measurements you have, the easier it is for editors to picture and enhance your layout.
- Fixtures
Are all the fixtures - stove, sinks, tubs, stairs, refrigerator, and the like - included? Are they occupying significant amount of space? While fixtures can help add value to the property, they may also take up space making the property look smaller.
- Accurate compass reading
Place your compass reading on the top left of the graph. The property’s orientation gives potential buyers an idea on probable temperatures and access to natural lighting. This will also help editors to thoroughly layout the property.
- Door locations, types, and swing
Mark all doors in their actual positions (entrance, exit, bedroom, etc.), types (sliding, single, double), and indicate the direction of their swing or opening.
- Properly scaled windows
Measure windows properly for precise scaling. You should be able to sketch the windows showing its exact position and size in relation to the walls.
- Photos for tricky areas or angles
Even with simple layouts, it’s easier for our editors to refine your plans with measurements and pictures of the area. Always attach photos of tricky spaces like your kitchen, bathroom, and other areas with complex layouts.
- Notes for additional information
It’s best to provide our editors with as much detail as you can given they haven’t personally seen the property. Include all non-standard setups to help our team fashion your best marketing tool in just 24 hours!
“How Do I Measure My Interior Floor Plans?”
Measuring your interior floor plan should be easy following these steps:
For Standard Interior
- Take at least two (2) measurements - four (4) ideally - for small rooms, and multiple ones for larger rooms and areas.
- Also take multiple measurements for complex rooms including fixtures for optimum floor plan results.
- Ideally, your measurements should be higher than your skirting boards and lower than your shoulders.
- Write your measurements legibly on corresponding walls or areas in the draft floor plan. You can even opt to use arrows and lines to clarify where the measurements belong!
- Treat split-level interior areas (e.g. garages, lounges, and annexes) as if they’re on separate levels and mark them accordingly. Don’t forget to add in stairs, if there are any.
- Leave notes detailing specifics on your floor plan to better guide our team.
For Unit or High-Rise Interior
PRO TIP #6: You can fast forward drafting your interior unit or high-rise floor plan by checking the unit’s emergency evacuation or fire escape plan! By law, this should be on every floor. This will serve as a guide in sketching your interior walls.
Some units have tricky angles and their fire escape plans may just be the answer. These plans sometimes have internal walls you can use as basis for your perimeter. Get your smartphones out and snap a few shots to use when you’re measuring.

BoxBrownie.com Step-by-Step Floor Plan Measurement
In doing your on-site sketch, it’s best to lightly pencil in before finalizing with permanent ink. This way, it’s cleaner and easier to erase through as you add entryways, windows, and other features.
1. Perimeter
We highly suggest familiarizing yourself with the property layout by walking inside and out before the measurements.
Start outside. We find it useful to use another graph paper for drafting the exterior layout, to roughly understand how the rooms flow inside.
For the interior, start your measurements on one side of the unit and do the rest of the rooms independently. Start with the far end of the graph so you have enough room to sketch. We recommend starting on your garage.
2. Second Floor
For two-storey properties, we find it best to start with the second floor measurements on another graph paper following the position of the first floor. This makes it easier to check the accuracy of both levels.
Don’t forget to label the floors - 1st floor, 2nd floor, etc. - to avoid confusion.
3. Rooms and Spaces
Ensure the right labels for your rooms and spaces. This way it’s easier for us to label them in the digitized version.
For garages and other buildings in the property, clearly indicate the width and depth of the areas. Include the type of garage door/s and if there’re drive-through access or storage areas. We can add cars, motorbikes, trucks, trailers, and other vehicles on your plans!
4. Doors and Windows
When marking your entryways, it’s ideal to clearly label the primary door “Entrance” while using an arrow. Always remember to add how the doors swing or open (refer to the symbol above).
You can opt not to measure your windows and doors to save time, but feel free to do so if you wish. Just mark them “roughly” on their position.
5. Fixtures and other features
Include all permanent fixtures, fittings, and storage areas in your sketch. Any inclusions in the home or unit should be included as it adds value to your home. The clearer the picture is for the buyers, the higher your chances in closing the deal.
For your kitchen fixture, include your kitchen counters, hobs, bars, island benches, butler’s pantries, gas stoves (indicate symbols if it has two or four burners), sinks (use proper symbols).
For the bathroom, mark your cupboards, vanities, showers, and baths.
Other fixtures to indicate are the fireplaces, cupboard interiors, and wardrobes.
6. Compass Direction
The property’s direction is of great important in marketing your floor plan. Use your smartphone to identify the direction or a compass if you have one.
Things to Double Check:
- Recheck rooms, windows, and door measurements and placements. Don’t forget pools and patios if there are any. Take down measurements religiously for an accurate and enhanced floor plan from our team!
- Clearly mark open-plan areas like your lounge or kitchen. Use graph paper for a cleaner and easier sketch.
- Use straight lines; wobbly lines are typically understood as curves.
- Write down the address to avoid confusion especially if you’re visiting several properties for the day.
PRO TIP #7: Use small rulers for your straight lines.

Quick Tips for Site Plan Measurements
If you’re providing your clients with a site and floor plan combo, just follow these quick tips for swift work:
- Printout a Google Earth or Street View of the property before your visit for precise measurements of the land. You can also get the roofline from the images to help with your drawing of the unit and surrounding area.
- While your laser measurer is extremely helpful, it has its limitations; daylight interferes with the laser. Invest in a measuring wheel (approx. US$32 at eBay).
- Walking roughly on the area would still do as we can add in disclaimers if you wish.