WHEN TO USE AN ITEM REMOVAL EDIT ON PHOTOS
Taking quality photos is a difficult skill and can be even harder when you put real estate into the mix. Often with real estate photography, you have to work with unfavorable conditions and time constraints, which can mean you photos don’t always turn out quite as expected.
Most professional real estate photographers will provide the home occupants and the agent with a checklist of things they need to do to get the property ready for photography. Often, a listing may not be ready for photos, so you’ll just have to work with it, hope for the best and edit the images later. Most professional photographers edit their photos in the post producing process which is time-consuming and technical, this is where outsourcing the editing process is beneficial for both the photographer and the real estate agent.
Other than the standard, and essential, Image Enhancement edit, using Item Removal on images can be one of the most important, changing the whole look and feel of a shot. Often a forgotten edit by many Property Professionals but an easy solution to many listing woes.

The Benefits of Using an Item Removal Edit
With the advances in photo editing software items within a photo can now be easily and quickly removed, as if it was never there. Using item removal on your listing photos benefits both Real Estate Agents and Property Managers, here are just some of the benefits:
- Make a space larger. Removing large items like couches to create space.
- When rental tenants won’t allow images of their personal belongings to be displayed. Item removal can be used to take them out of all photos and make the home look empty.
- Declutter a room. Sometimes telling an owner they have too many belongings is hard, so use an item removal edit to take them out after the photos have been taken
- Remove personal items, like family photos and religious artifacts to appeal to a broader market.
- Remove old and unattractive furniture. This saves on getting a removalist and means photos can be taken quickly ready for advertising.
What Should You Be Removing From Real Estate Photos?
Decluttered homes are more appealing and sell faster! The idea is to only take items out of an image that may be unappealing to a buyer, you don’t want to completely change the look of a home. We always recommend not to remove any permanent fittings unless it is for a specific purpose. Removing items like light fittings, doors, curtains and bathroom fittings can be misleading, if the item is going to be there when the new owner or tenant moves in, then it needs to remain in the photo.
Here are some common items that Agents and Property Managers should be
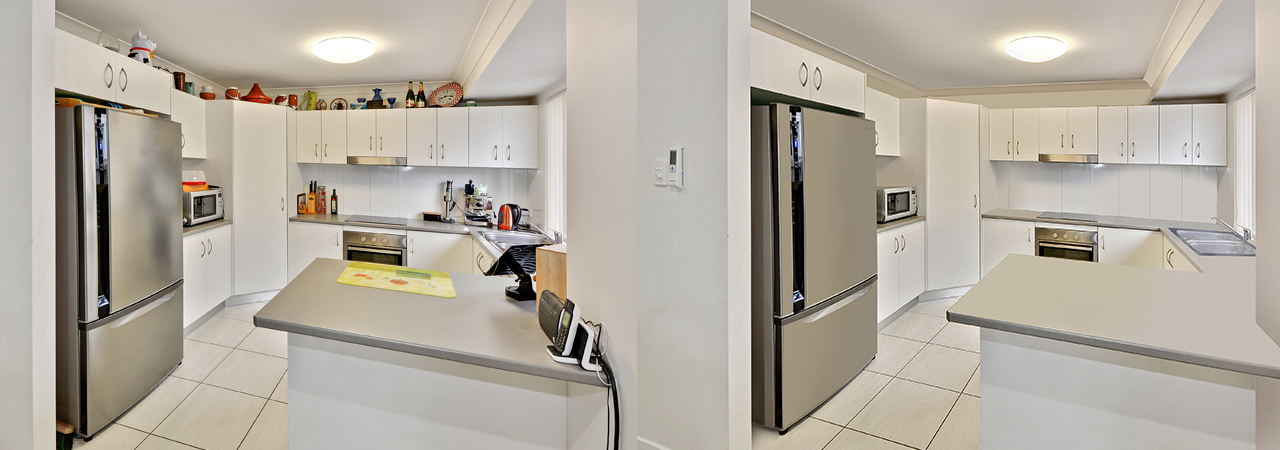
- Clutter from main living areas like kitchens and bathrooms
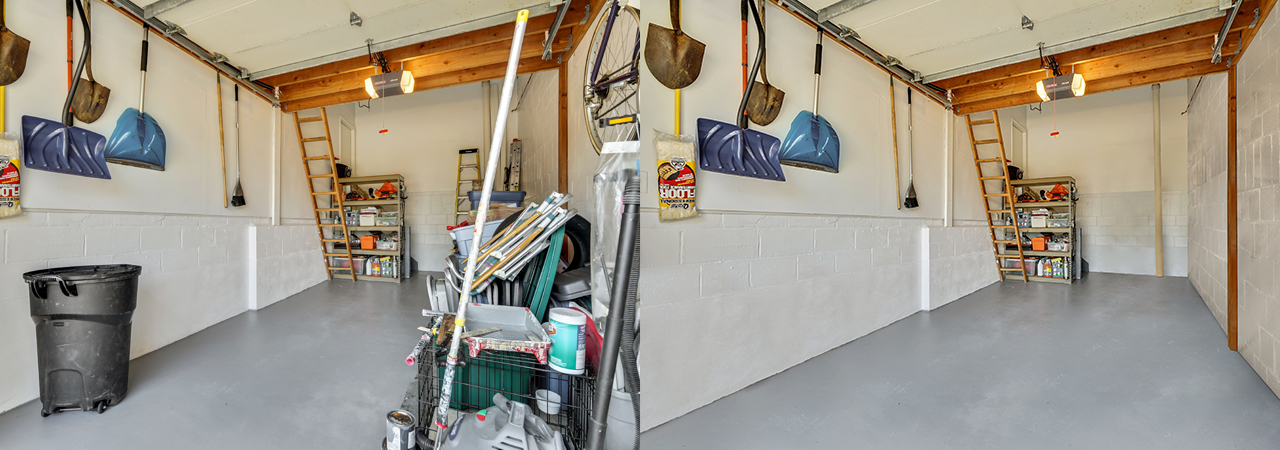
- Remove garbage bins from the front of a property
- Remove family photos and magnates from fridges and kitchens
- Sporting memorabilia
- Pets, toys, bedding and religious items
- Holiday decorations, such a Christmas trees which can date a property and show when it has been photographed.
What Can’t Be Removed From An Image
Every photo is slightly different, but there are some things that even the best editors will struggle to remove realistically. When editors are removing items in photos, the editor needs to know what is behind the object, as they use a ‘cloning’ tool to erase the item and replace it with the background. The editor needs to visibly have something to ‘clone’ to make the item realistically disappear. For example, removing an image on a wall is usually easy as most homes will have a plain wall behind it. But removing an outdoor setting from a tiled balcony can be harder, as the editor needs to line up tile grout properly and any balcony railing.
Things to keep in mind when deciding what to remove from an image:
- The background behind the item needs to be simple and easy to clone
- The item needs to be relatively clear and simple to remove
- The background behind the item needs to be simple and not too detailed. Being about to replicate complicated patterns often never looks realistic.
What Should You Remove Prior to the Photoshoot
We recommend if possible to remove as many things as possible from the image prior to the
Here are some items we strongly recommend removing prior to a photoshoot:
- Kids and pet toys
- Excess floor mats
- Anything on benches in kitchens and bathrooms
- Pool cover and cleaner
- Tidy walk-in cupboards
- Garden equipment.
Can All Image Types Have Item Removal Applied to Them?
Our editors can work on all types of images from both professional photographers to beginners, and DSLR cameras to smartphones. However, the quality of the image will greatly affect how realistic the item removal is.
Photos
Item Removal is a great edit to use for various reasons, it can save you time and money when you need to get your listing advertised fast, but still look professional. Our Item Removal edit can also be used in conjunction with Virtual Staging, as you can remove old furniture and realistically replace it with modern items.