HOW TO SHOOT HDR BRACKETING
Importance of HDR bracketing in photos.
Bracketing can sound like a complicated process but in order to take your real estate photos to the next level, it is something you may want to consider.
So what is bracketing? It is 5 stills of the same images shot in different exposures. Your first still will be the darkest and the last still will be the lightest. These are called your bracketed images and later in this tutorial you will see how they are combined to produce a high-quality professional photo.
In order to achieve this, you are going to need a good DSLR camera where you can manually alter the level of exposure. The brackets we have taken below are in the following exposures:
- -2 Exposures
- -1 Exposures
- 0 Exposures
- +1 Exposures
- +2 Exposures
So before we look at what these exposures look like in an image, let's look at a single bracket image example first so you can understand the difference.
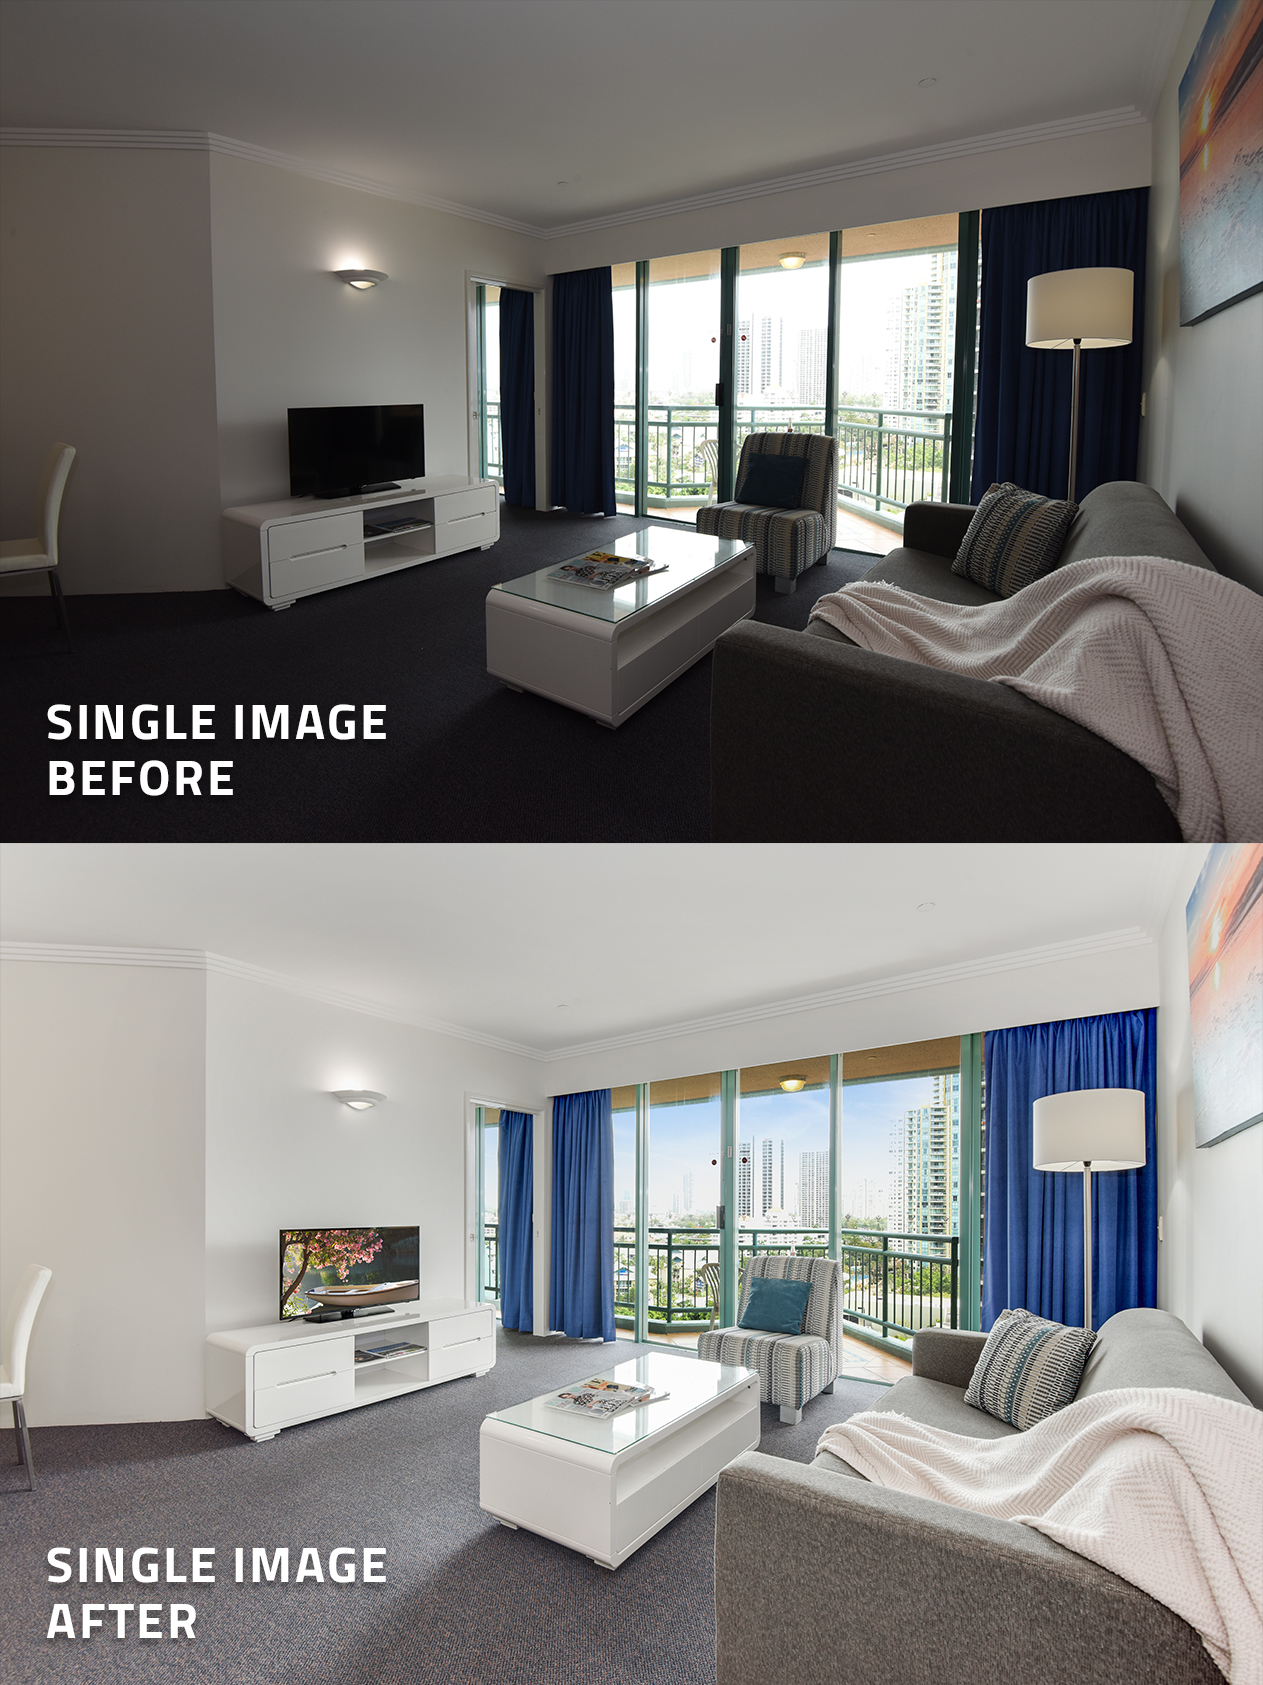
Single Shot Image Example
As you can see from the initial image supplied, the outside detail is lacking quite significantly. This missing information in the single bracket really affects the end product which could be a serious factor for selling this property when the view plays a big factor in attracting potential buyers.
Now that you have seen an example of a single bracketed image, lets have a look at an indoor and outdoor example of HDR bracketing.
Indoor Image Example
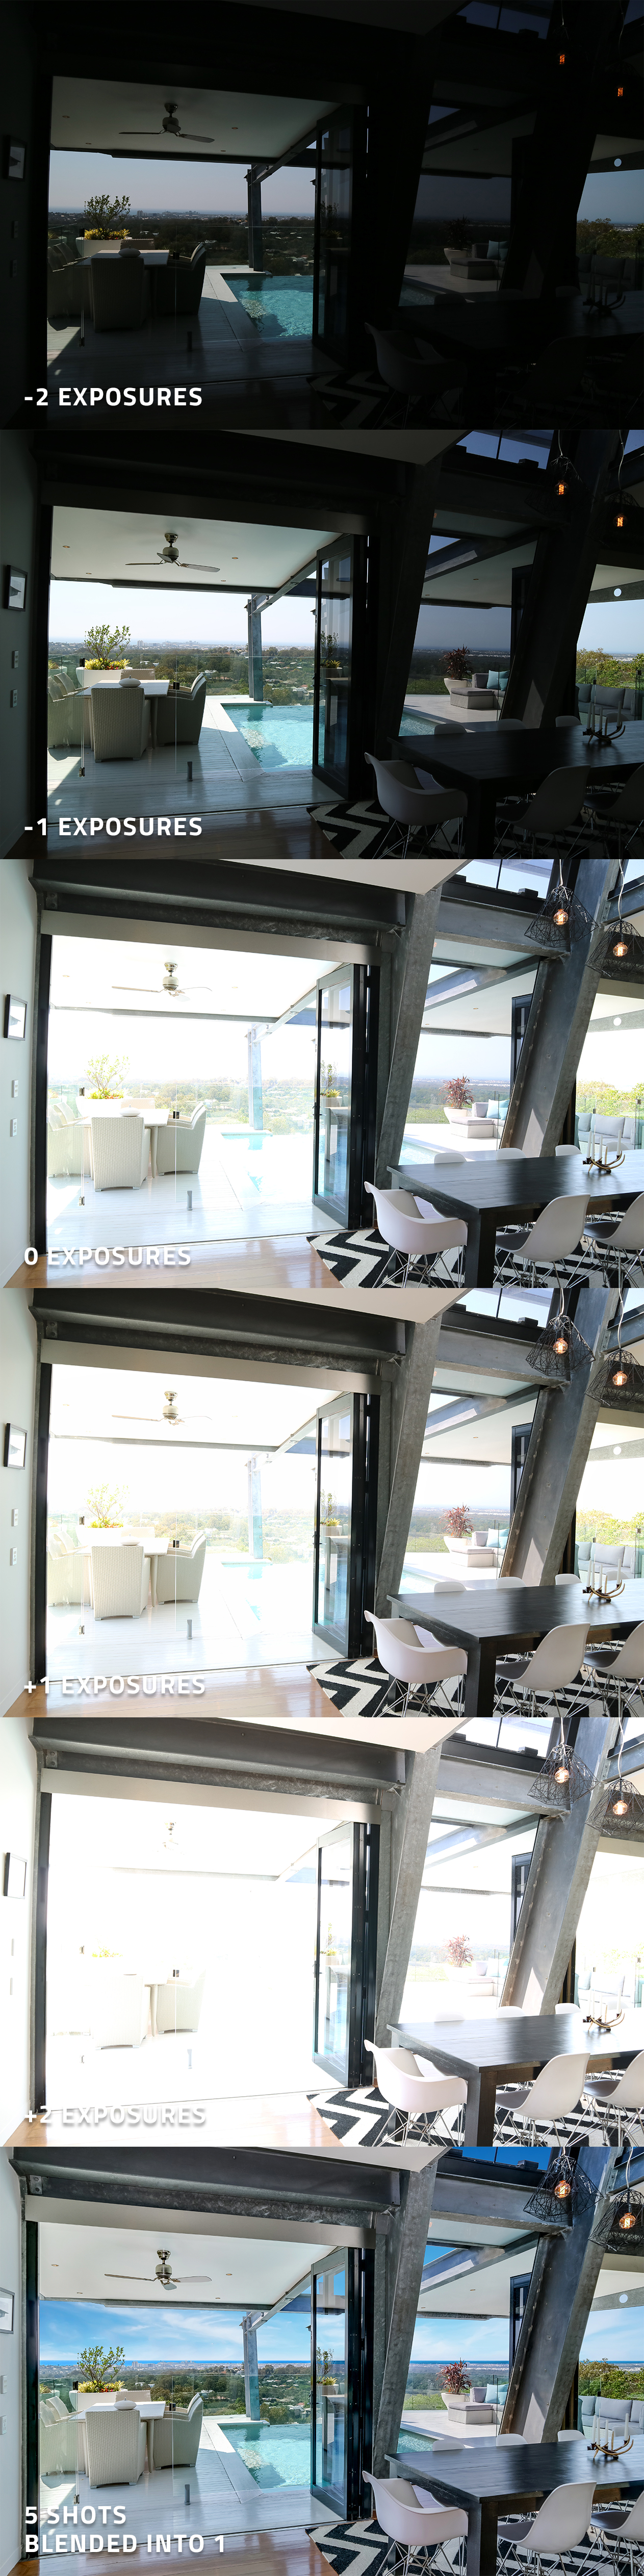
- 1st Bracket: From this first bracketed image taken, you can still make out some of the details.
- 2nd Bracket: You can see how there is more detail around the center of the image.
- 3rd Bracket: The third image is our in-between bracket. You can start to see how we are getting more details on the interior whilst the exterior and the glass is blown out.
- 4th Bracket: This bracket you could almost skip as it is similar to the previous, however, it is providing some better detail of the structure and beams which will be useful for filling in any shadows later on.
- 5th Bracket: This is clearly the bracket that is more blown out detail wise. But it is important to include to get a good range of the room in every light and also fill those shadows.
We recommend 5 brackets to submit for the one photo to give BoxBrownie.com the best range of brackets to create one flawless photo. With these 5 well exposed shots, we can create a magazine finish every time.
Outdoor Image Example
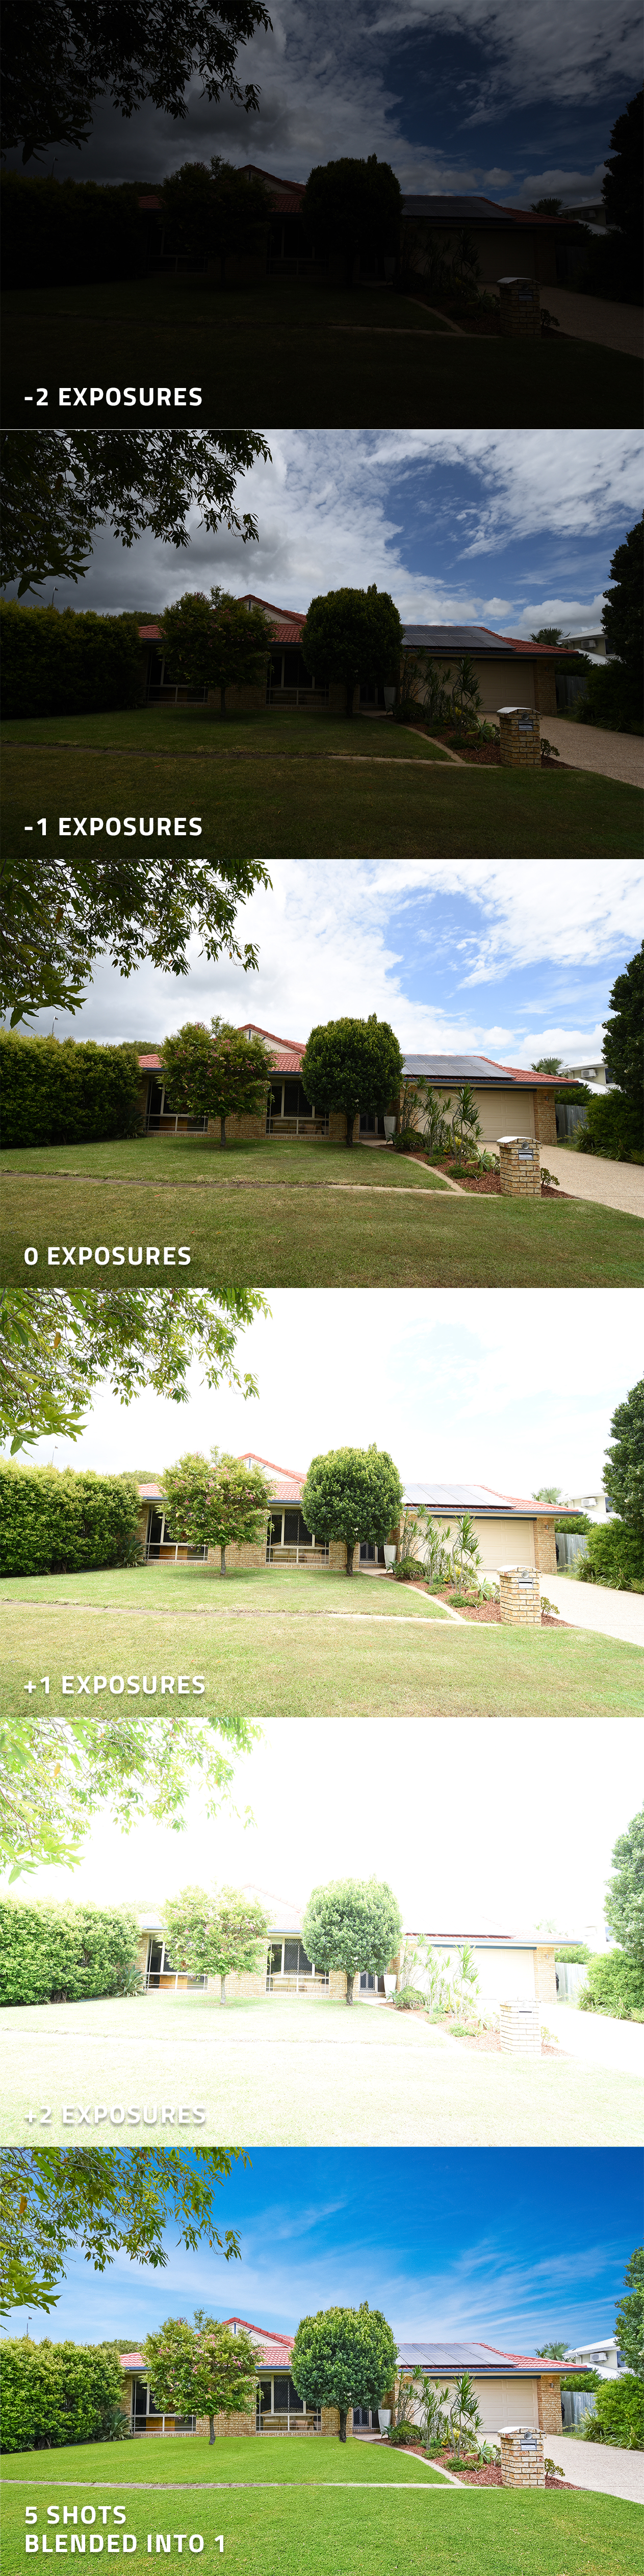
- 1st Bracket: The darkest bracket provides good detail of the solar panel and tree foliage. It is a bit dark but is still manageable.
- 2nd Bracket: Next is a slightly lighter shot but you can really make out everything in the image.
- 3rd Bracket: This bracket is a really great shot for getting all the detail in the lawn.
- 4th Bracket: Very similar to the previous bracket but you can obtain more detail of the tree foliage.
- 5th Bracket: The lightest shot of all will fill any shadows we have when combining all 5 images.
With these brackets we layer them like a collage, rub off the parts of the images we don’t need and add in the parts we do.
Conclusion
This is the exact same process any real estate photographer would follow to shoot their images and exactly how you should do it too. Especially if you want that exterior window detail that is very clearly lacking in the single bracket example that we first showed you.
Now you have the secret tips and tricks on how to shoot HDR bracketed real estate photos, you can achieve that high end professional finish for every single one of your listings.
RELATED ARTICLES

Patchy lawns can kill curb appeal — but digital edits come with rules. Learn how to enhance your listing ethically, stay MLS-compliant, and wow buyers without misleading them. Click to see our expert tips!
READ MORE
If you’re a real estate agent, property manager, or builder using an iPhone, you’re already halfway to great listing photos. SnapSnapSnap takes you all the way — with automatic HDR, built-in framing guides, and professional editing at your fingertips. See why our app outperforms your iPhone every time for property photography.
READ MORE
Think you need a DSLR for pro property photos? Think again. Learn how to capture stunning, market-ready shots using just your iPhone, SnapSnapSnap, and our Image Enhancement edit — even in rainy weather.
READ MORE
Capturing that perfect drone real estate image might seem like a daunting task, particularly if you’re new to the property photography game, but don’t let that scare you off. In this tutorial, we will walk you through each step of the process from choosing the right drone and taking the perfect shot to having your images professionally edited.
READ MORE
Real estate listings with aerial photos sell faster than those without, and 73% of sellers would rather list with agents who use aerial photos. It's really a no-brainer, aerial pics can be a lifesaver!
READ MORE
Discover how Tom Lyons and his team are transforming property marketing in Belleville, Ontario, with SnapSnapSnap. By capturing stunning HDR images directly from a phone, they’re saving time, reducing costs, and delivering exceptional service. Read now!
READ MORE