HOW TO EASILY CREATE A VIRTUAL TOUR FOR REAL ESTATE LISTINGS
Are you a real estate professional looking to give your property listings that extra "wow" factor? Look no further! Virtual Tours are a game-changer for showcasing real estate and creating an immersive experience for buyers.
In our latest video, Brad Filliponi, our co-founder and professional photographer, demonstrates just how easy it is to create virtual tours and guides you through the process.
Whether you're marketing a cozy apartment or a sprawling mansion, a Virtual Tour can make your property stand out from the crowd and reel in potential buyers. So, how do you go about creating one? Let's break it down step-by-step!
Step 1: Gear Up
To get started, you’ll need a 360° camera. We’re not talking about any old camera—this is the tool that’s going to help you create that "I’m actually there" experience.
The Ricoh Theta Z1 is our top recommendation. It’s user-friendly and produces excellent quality
If you're working with a tighter budget, the Trisio Lite 2 is a solid option too. For a tripod, we recommend the Neewer Lightstand. However, if budget isn't a concern, the IFootage Cobra 3 monopod system is the cream of the crop.
Step 2: Set Up Your Camera
Now, onto the fun stuff! First things first, pair your camera with your smartphone. For Ricoh Theta Z1 users, use the Ricoh app—it’s your new best friend.
Set your camera’s ISO to the lowest number possible (200 is your magic number), crank up the image resolution to 6720x3360, and turn on HDR for those crisp, bright details that will have buyers falling in love with your listing.
Step 3: Prep the Space
Before you snap away, get the property looking its best. Remove anything unnecessary like shampoo bottles, pet bowls, remote controls, or yesterday’s laundry!
Turn on all the lights, open doors to create flow, and make sure the furniture is straight and the bedspread doesn’t look like it was just wrestled with.
No time for a clean up? No problem! Check out our Item Removal and Virtual Clean edit to quickly transform your photos, making them look their best with minimal effort.
Step 4: Capture 360° Photos
With everything prepped, it’s time to take those shots. Place your camera right in the middle of the room.
Pro tip: Hide in another room while you press that shutter button—you don’t want to accidentally photobomb your own Virtual Tour.
Start with one room, check your phone to ensure everything looks good, then rinse and repeat for the entire property. Yes, even hallways! These often-overlooked spaces add to the user experience and help create a seamless tour.
Step 5: Edit Your Photos
So, you've got your 360° photos—great! But raw images don’t look as polished as you'd like them to. That’s where a bit of editing magic comes in. You can either spend hours doing it yourself or simply submit your photos for 360° Image Enhancement editing, and we’ll handle all the heavy lifting. We can turn your shots into marketing gold in just 24 hours!
Step 6: Create the Virtual Tour
Now, let’s bring it all together! Head over to your BoxBrownie.com dashboard, select Virtual Tours, and add a new job. Upload your edited images and label each one (Bedroom 1, Kitchen, etc.).
Have a floor plan? Upload it and it will be displayed within the tour, giving buyers a complete understanding of the layout.
Hit submit, and voilà! In just 24 hours, you’ll have a slick, interactive Virtual Tour ready for your real estate listing. You’ll even get a custom link to share with potential buyers and agents, allowing them to explore the property with ease.
Start Creating Your Immersive Marketing Today
So, what are you waiting for? Making a Virtual Tour is easier than it sounds—and with the right tools, you can take your real estate marketing to the next level. Whether you’re a seasoned pro or just starting, these steps will ensure your property gets the attention it deserves.
Want to elevate your property marketing with an immersive Virtual Tour? Sign up for free with BoxBrownie.com today and transform your listings into engaging, interactive experiences!
RELATED ARTICLES

3D renders are great for selling off-the-plan. And they have other uses as well. We’ll look at a couple here that might feel like a welcome rain during this housing market shortfall.
READ MORE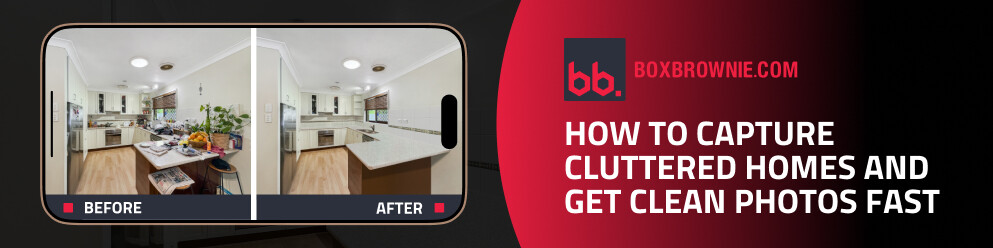
In our latest video, cofounder Brad Filliponi shows how messy rooms won’t hold up your listing. With SnapSnapSnap, shoot once and get polished, buyer-ready photos in just 24 hours.
READ MORE
Virtual Staging is a powerful tool for showcasing properties, especially during the holiday season. Discover how to add festive charm without overdoing it! Nail it every time with these must-know dos and don'ts!
READ MORE
We often mention that presentation is the key to selling property. In this case, it’s not how you present the property that is most crucial - it’s how you present yourself, your knowledge, and your ability to sell the property that counts the most.
READ MORE
We get asked all the time, should I be using an expensive DSLR camera to shoot real estate? With the incredible advancements in smartphone technology, we put the new iPhone 12 to the test using the SnapSnapSnap app. Can you really shoot professional listing images for less than US$30? Let’s find out.
READ MORE
Post-pandemic life is uncharted waters for the commercial real estate industry. Covid-19 has altered the way life is lived and the changes are already creating problems in the commercial sector. New, creative methods are necessary to stand out from the ever-growing crowd of available listings. BoxBrownie.com has just made a very potent method available at a dramatically lower staging cost.
READ MORE