HOW TO SHOOT REAL ESTATE USING AN IPHONE 12
Once upon a time, if you wanted professional-quality real estate photos, you needed a high-end DSLR and a trained eye. But today, things are different. With the iPhone 12, smart apps, and the right editing tools, you can now produce magazine-quality property images without the hefty price tag — or the bulky gear.
Ditch the DSLR? Let’s Put the iPhone 12 to the Test
At BoxBrownie.com, we’ve always believed great listing photos shouldn't require a massive investment. That’s why we built SnapSnapSnap — an iPhone-only app that transforms your smartphone into a powerful real estate photography tool.
Can it really compete with pro gear? In this blog, we’ll walk you through exactly how to use SnapSnapSnap with your iPhone 12 to shoot a full real estate listing — and get it professionally edited — for under US$30.
Step 1: Open the SnapSnapSnap App
Start by downloading SnapSnapSnap from the App Store and logging in with your BoxBrownie.com account.
SnapSnapSnap was built specifically for real estate agents, property managers, and Airbnb hosts who want great photos without investing in expensive camera gear. The app helps guide your shoot and connects you directly to our professional editing team.
Step 2: Walk Through the Property and Plan Your Shots
Before you start snapping, prepare the space:
- Turn on all interior lights
- Open blinds and curtains
- Clear away clutter and personal items
- Make beds, fluff cushions, and tidy each room
Think of this step as staging for success — you want each photo to show the space at its best.
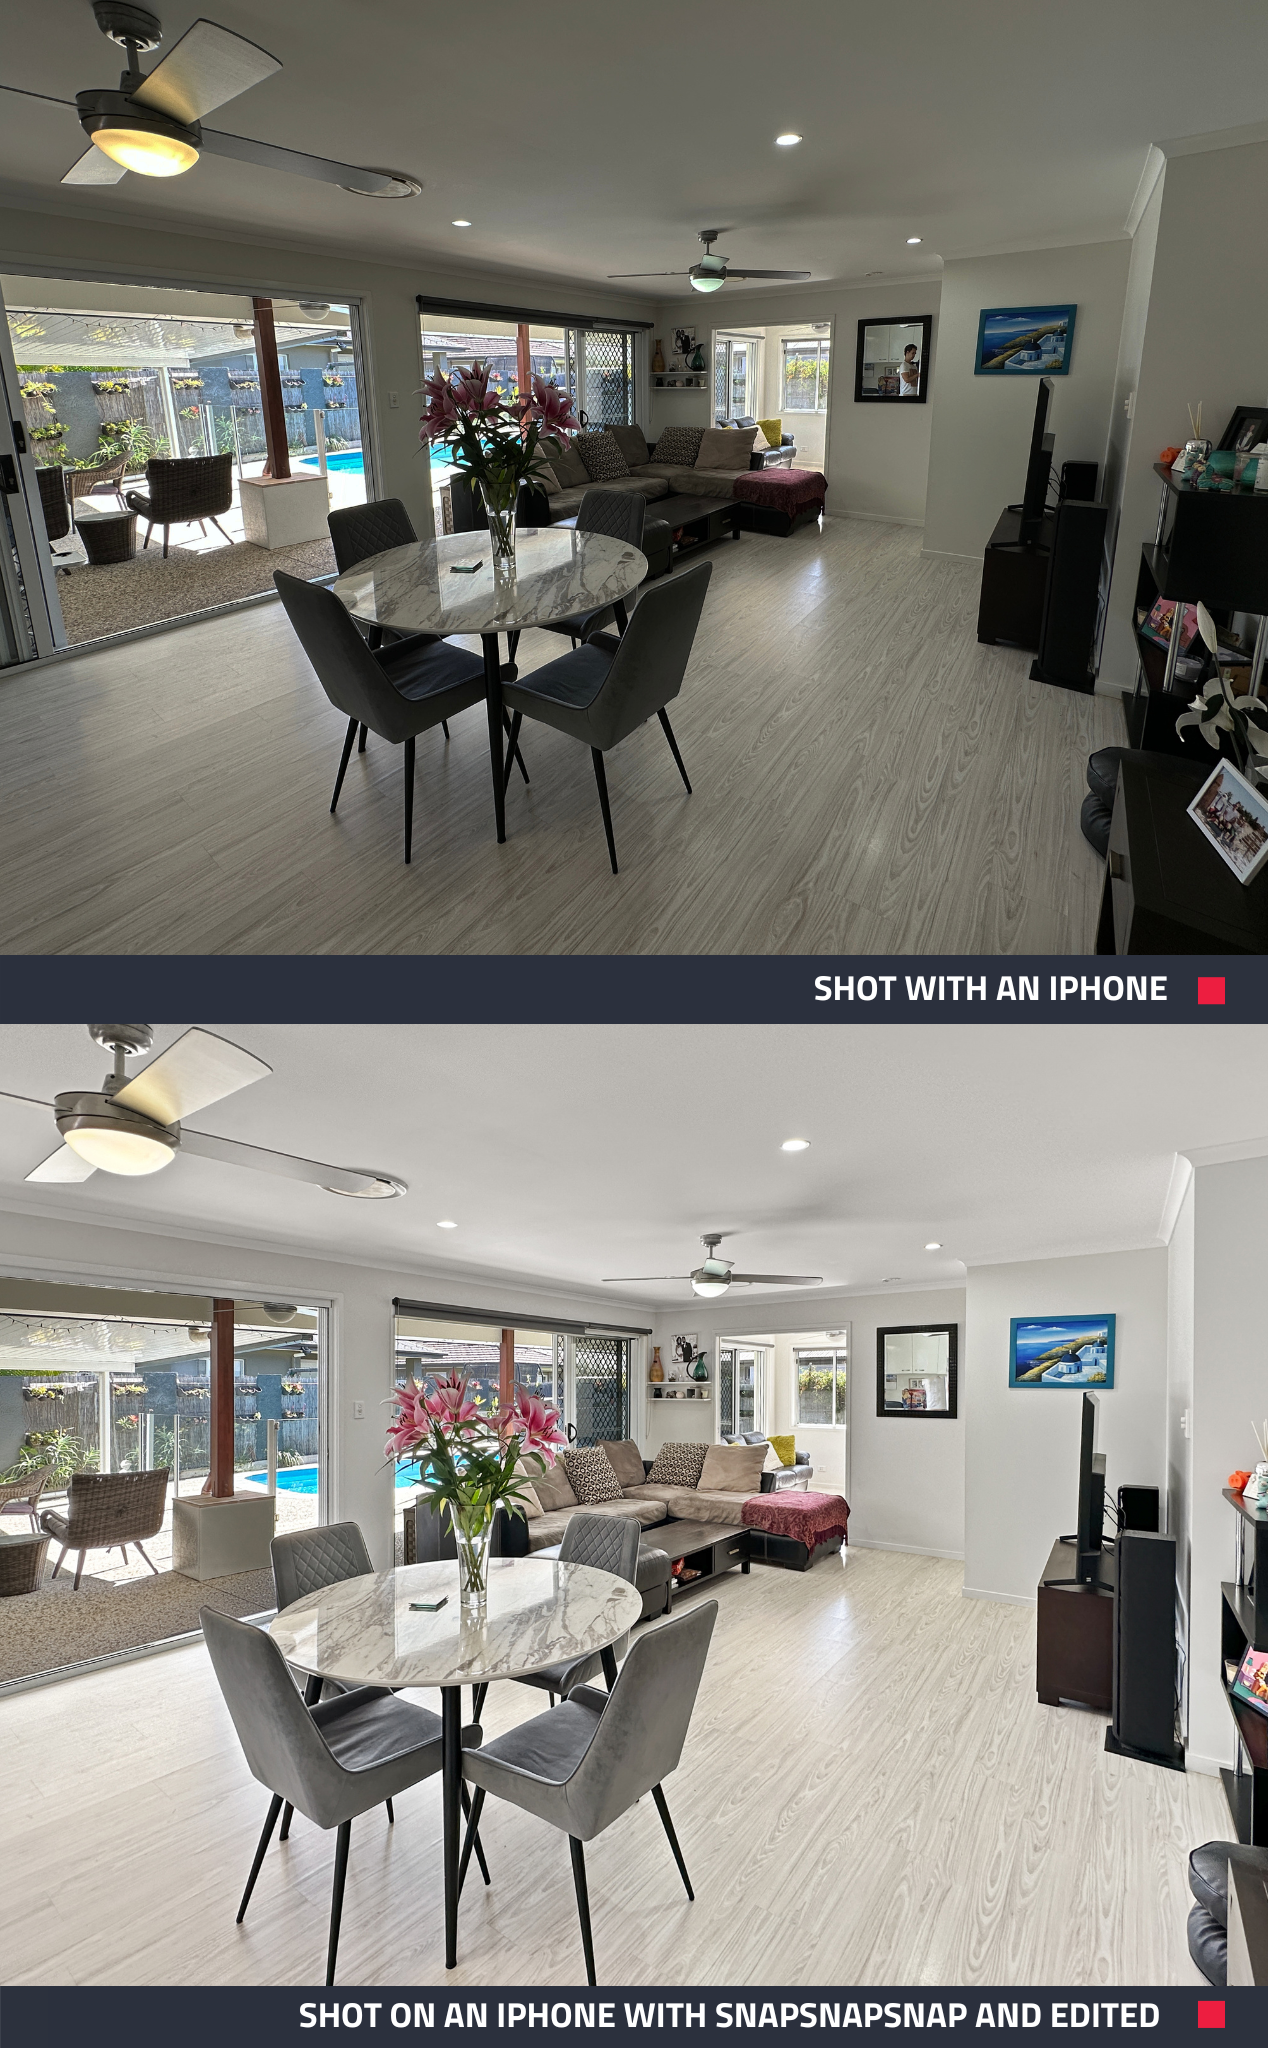
Step 3: Shoot with Confidence Using SnapSnapSnap
SnapSnapSnap makes it easy to capture professional-quality real estate photos using your iPhone, and before you begin, make sure you’ve got the settings arranged to what you need.
When you open the app, you’ll see a built-in grid that helps frame your shots and keep vertical lines straight — a key detail for polished, professional results. When using either Balance Capture mode or Pro Capture mode, the app automatically takes multiple exposure brackets with a single tap.
These exposure brackets are then expertly blended by our editing team to produce one clean, true-to-life image — accurately balancing bright windows and interior details for natural-looking results.
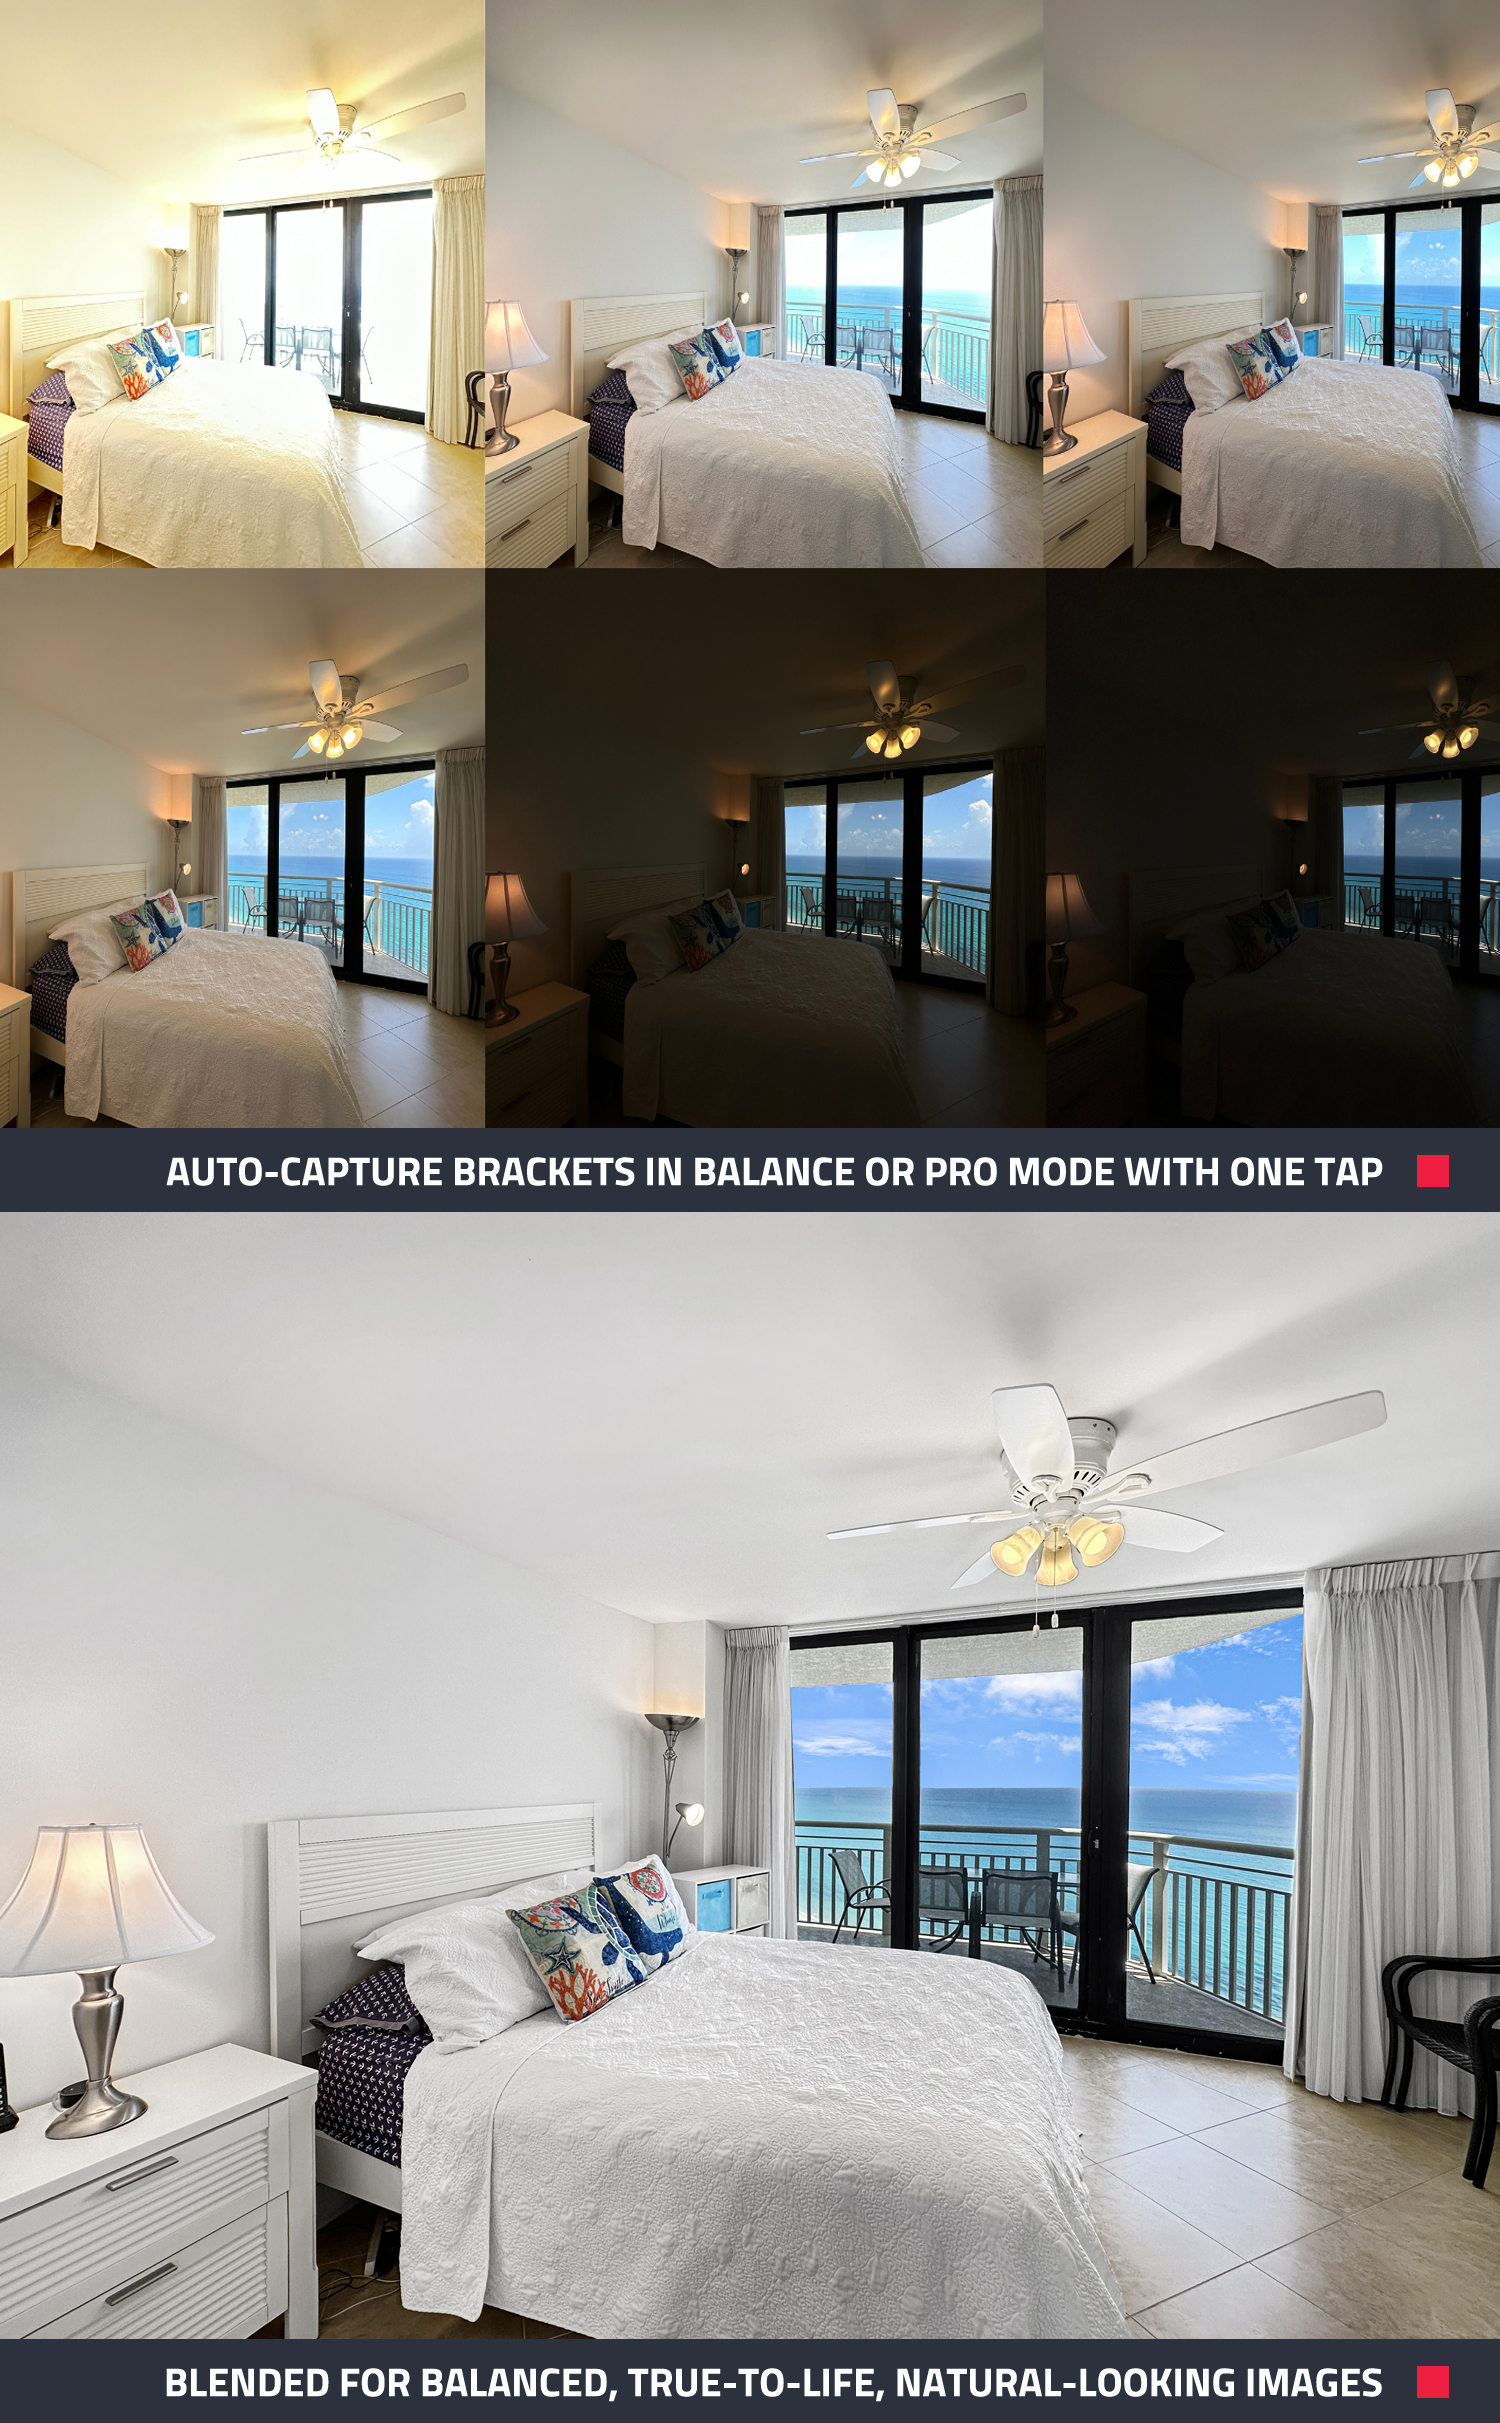
To ensure the best possible image quality, it’s important to hold your phone steady while the brackets are being captured. Movement during this process can result in blur or ghosting. For handheld stability:
- Tuck your elbows into your body
- Hold your phone with both hands
- Stay still for a moment after pressing the shutter
A tripod is not required when using Balance Capture mode, but it can help improve consistency and sharpness, particularly in lower-light rooms or wide-angle shots. However, a tripod is essential when using ProCapture mode, as this advanced setting captures more dynamic range but is less forgiving of any movement.
As you move through the property, take multiple shots of each room from different angles. You’ll be able to select your best images when submitting for editing through the app.
Step 4: Submit Your Photos Through the App for Editing
Once you’ve finished your shoot, you can submit your photos directly to our professional editing team — all within the SnapSnapSnap app.
We recommend submitting:
- 15 images for Image Enhancement (USD $1.60 each)
- 1 exterior image for Day to Dusk (USD $4.00 each)
That brings the total to just USD $28.00.
Our editors will professionally enhance each image and return your finished files within 24 hours. You’ll get bright, clear, listing-ready photos — fast, affordable, and stress-free.
Step 5: Let the Editing Team Work Their Magic
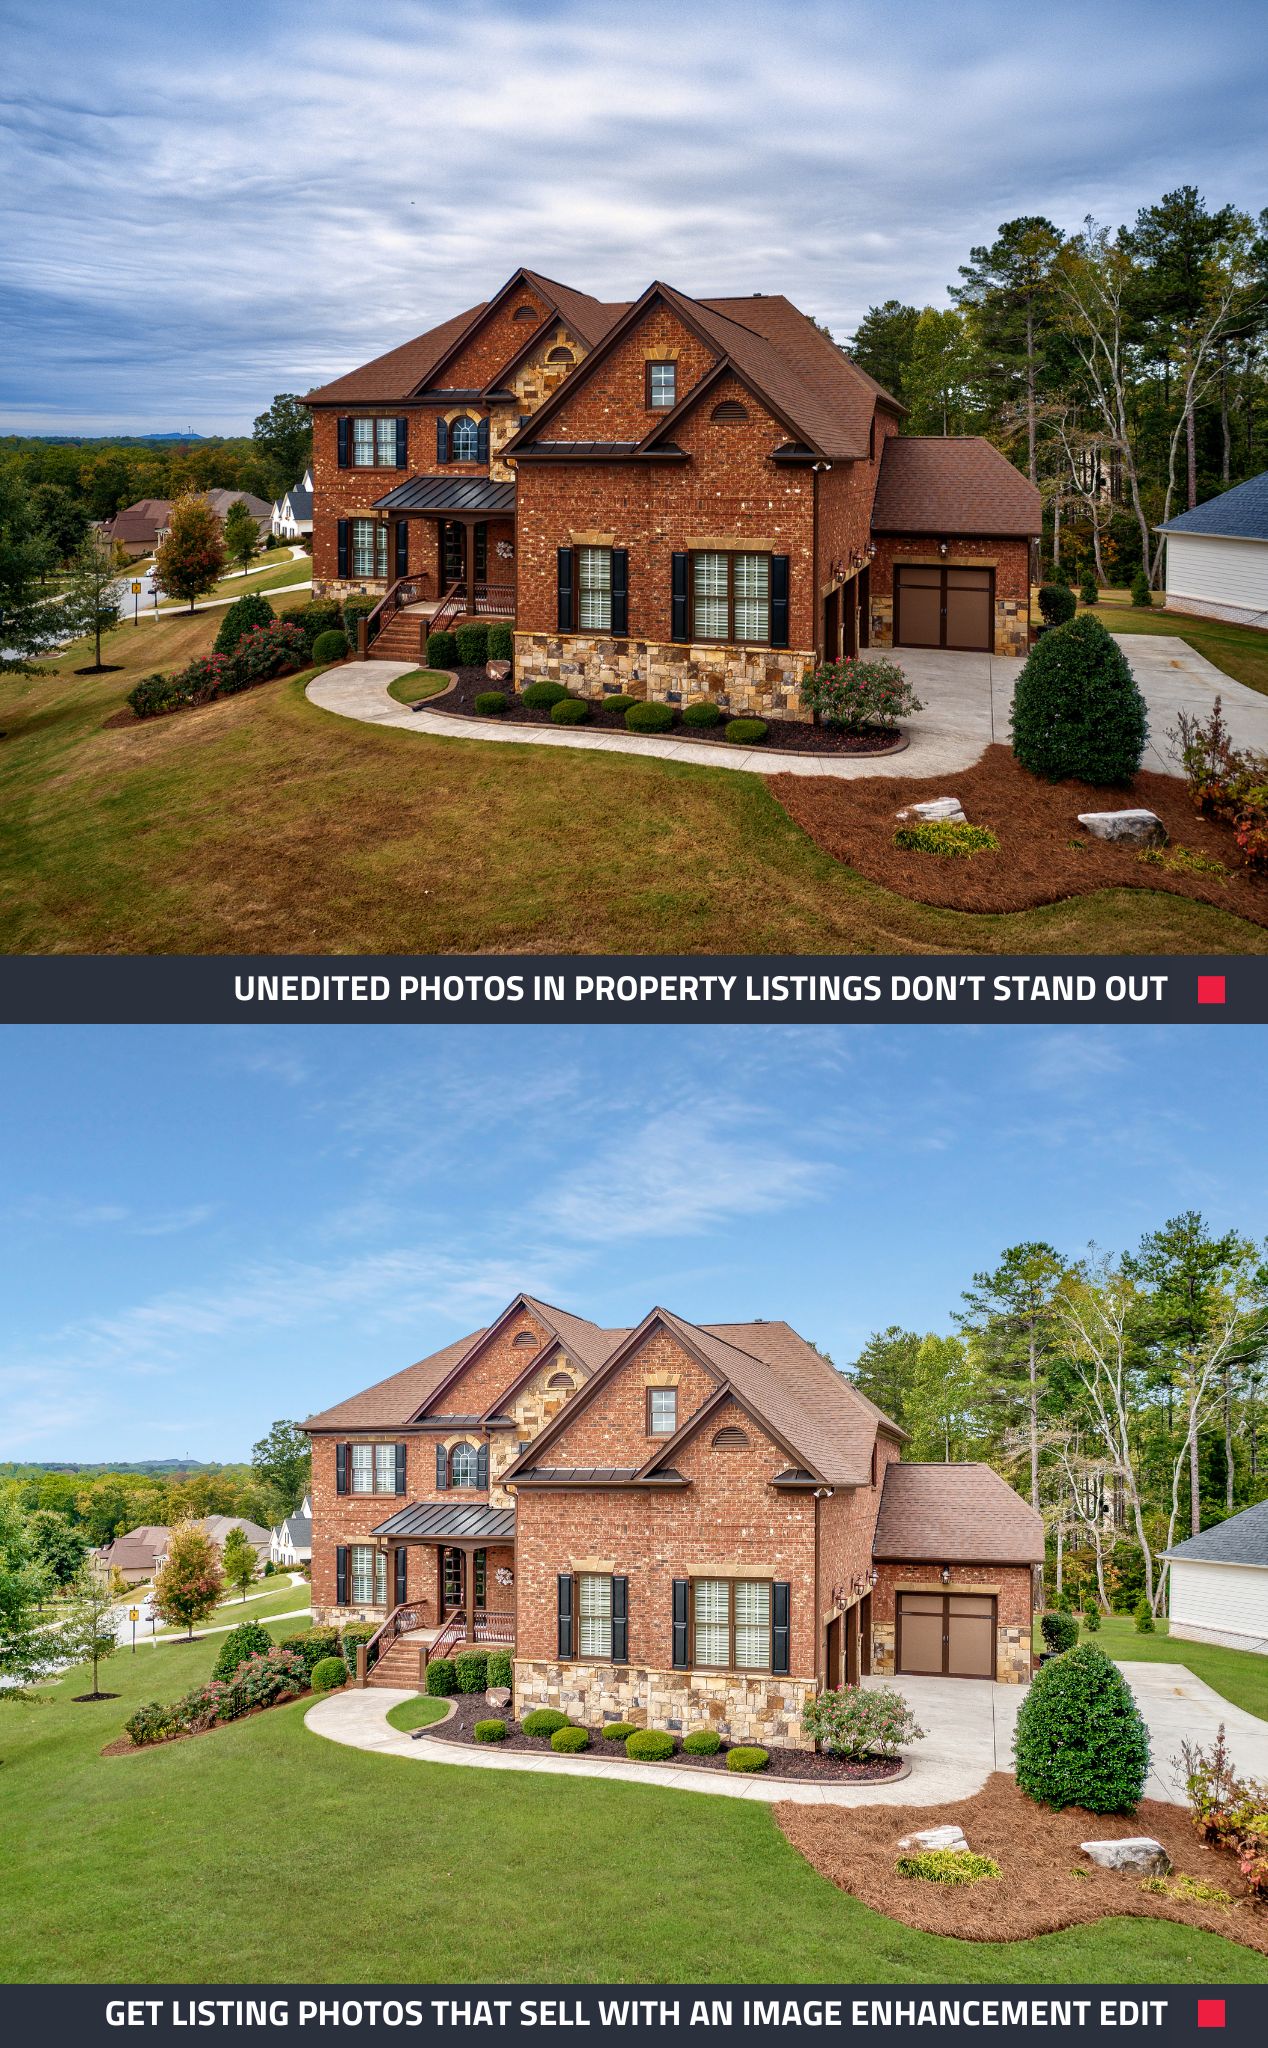
Your photos go through our signature 17-step Image Enhancement process, which includes:
- Brightness, contrast, and tone correction
- White balancing and color adjustment
- Straightening, sky replacement, and object removal
- Lawn and TV screen enhancements, and more
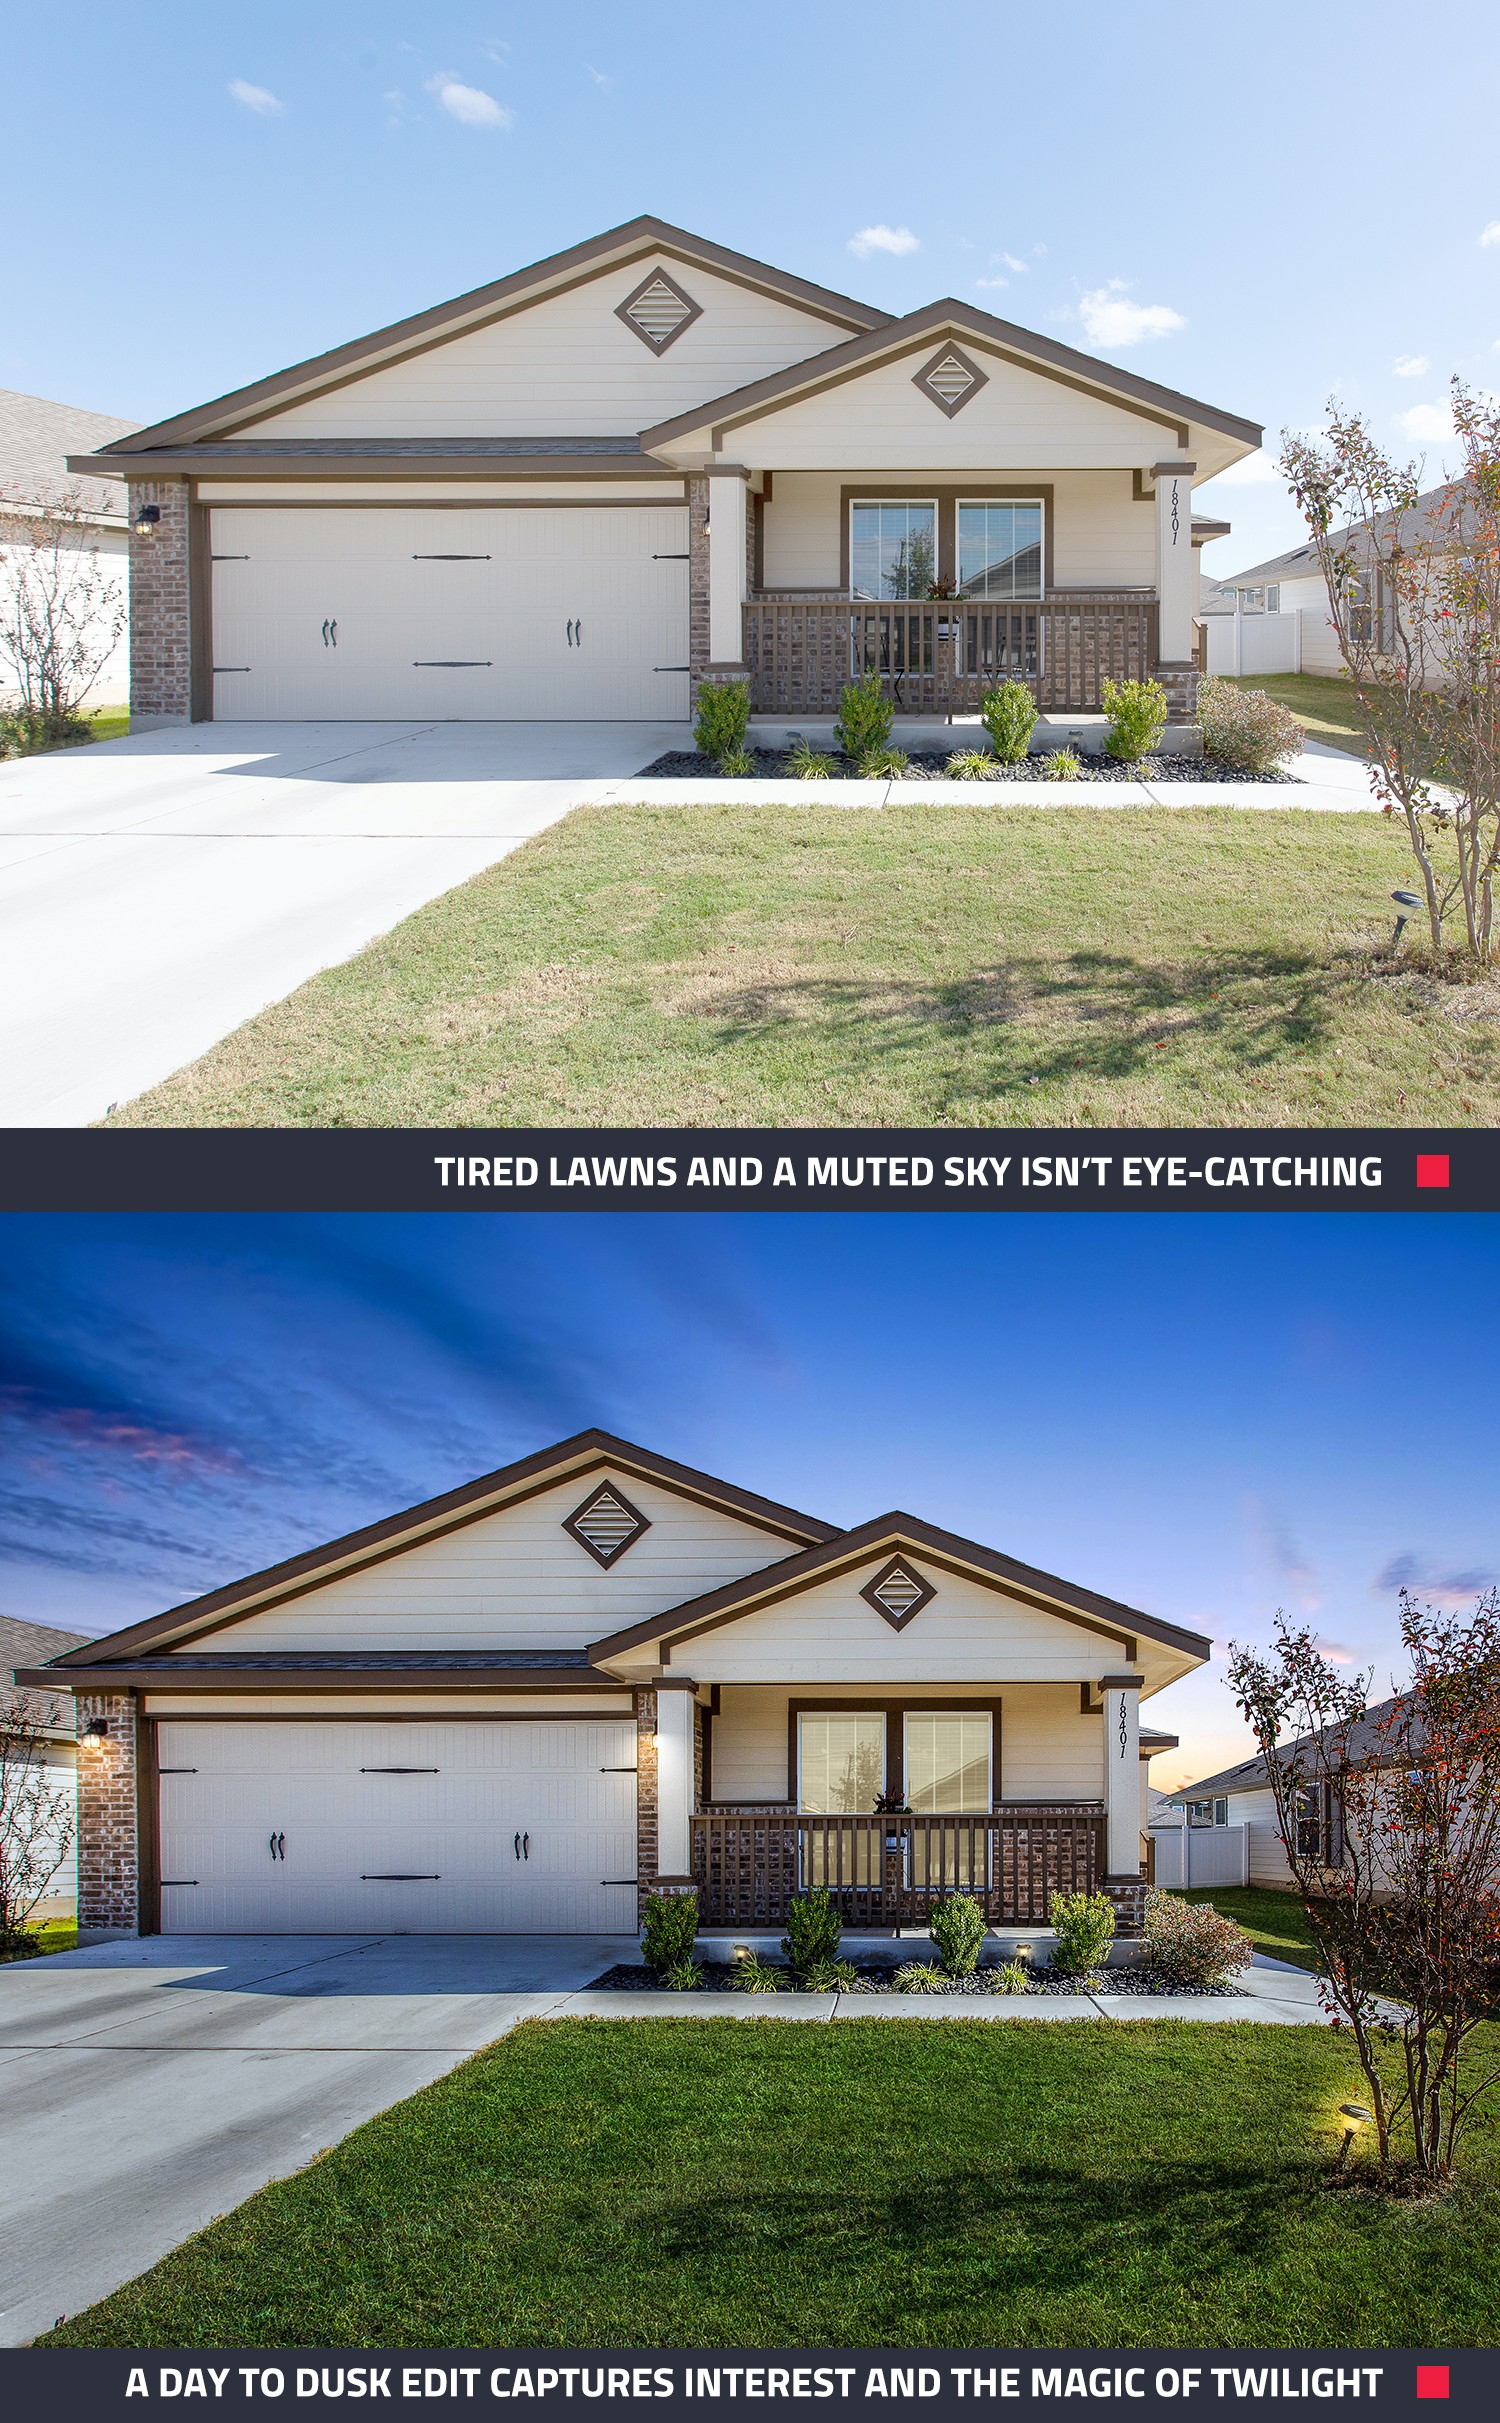
For your hero shot, our Day to Dusk edit adds a beautiful sunset sky and warm lighting to create a high-impact exterior image that grabs attention online.
Step 6: List With Confidence
With your images returned in 24 hours, you're ready to publish your listing. SnapSnapSnap users can also take advantage of Item Removal & Virtual Cleaning and Virtual Staging edits to ensure your listing looks its best.
Want to take it to the next level? Pair your visuals with other BoxBrownie.com services:
- A professional floor plan
- A virtual tour
- A free AI-generated property description

The Verdict? Pro Results Without the Pro Gear
SnapSnapSnap makes it possible to capture and submit high-quality real estate photos from your iPhone 12 — and get them professionally edited for under US$30.
It’s fast, affordable, and designed to empower agents, property managers, and hosts to take control of their marketing. Whether you’re listing your first property or your fiftieth, SnapSnapSnap gives you the tools to shoot with confidence and get results that sell.
Ready to see the difference? Try SnapSnapSnap today and take your real estate photography to the next level!
RELATED ARTICLES

Think you need a DSLR for pro property photos? Think again. Learn how to capture stunning, market-ready shots using just your iPhone, SnapSnapSnap, and our Image Enhancement edit — even in rainy weather.
READ MORE
Gotta see it to believe it! Our Virtual Renovation service can transform even an old shed into a stunning Air BnB rental. If you have unused space on your property, this post can show you how to turn that emptiness into income.
READ MORE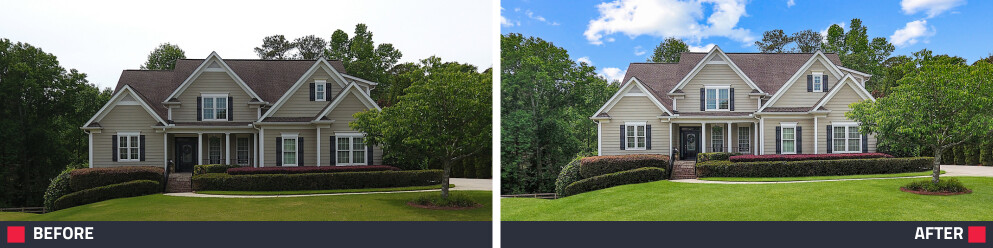
Welcome to BoxBrownie.com. Get set up quickly for professional property photo edits with 4 free trials. Access your dashboard, how-to videos, photography app, and expert resources to save time and elevate listings.
READ MORE
Get your team 2026-ready with our free property marketing training! We tailor each session to your team’s needs — from cost-effective photography that streamlines your marketing to creating listings that stop the scroll. Save time, boost results, and start January strong.
READ MORE
Jon Sweeney transformed leasing across a 680-unit portfolio by upgrading listing photos. With sharper images and strategic virtual staging, even hard-to-rent units gained traction—cutting vacancy times and driving faster, more consistent leasing results.
READ MORE
Want to take your real estate photos to the next level? These 10 quick tips from Brad Filipponi will help you capture clean, professional images that stand out and sell faster—whether you’re using a phone or DSLR.
READ MORE