DSLR CAMERA SETTINGS FOR AGENTS TAKING REAL ESTATE PHOTOS
Property professionals can save thousands of dollars if they are willing to learn how to take their own photos. Doing this isn’t hard, it is just about knowing a few techniques and using the correct camera settings.
“Real estate photography is just like baking a cake – Everyone has their own recipe” – Brad Filliponi, BoxBrownie.com Director and Property Photographer
To help budding real estate photographers get started with their photography career, we have put together a few basic tools and techniques you need to capture the best photos.
Before We Start
Before we get started on the settings and techniques of getting the best real estate shots you’re going to need the following tools of the trade:
- Digital SLR full frame or cropped sensor camera (Here are some different gear setups we recommend). Compact cameras can work with this method, but some settings may be different between models, so in this case please refer to the manual.
- Wide angle lens - 16-17mm lens (full-frame body) or 12-15mm lens (cropped sensor body)
- External flash system – The bigger the better, but use the lowest flash setting.
- Sturdy tripod – Set at eye height.
** Here are some camera gear setups that we recommend "The Best Camera Setup For Real Estate Photography"
The thing that separates amateur photographers from professionals is the knowledge on how to do “window masking” or HDR Photography. This is the technique of taking multiple exposures of a room and then blending the images together in the editing process, producing a final image where you can see the details inside the room as well as outside the window.
Setting Up and Using Your DSLR Camera
Cameras now have hundreds of settings, but to take great photos you need to know how to use them correctly. For getting started in real estate photography you can use some basic settings, and once you get more confident try some more advanced techniques.
Here is some of the basic setting you will need to get the best photos the first time. Every camera is different, so refer to your camera’s manual for changing the settings.
- ISO or film speed – 100 ISO only.
This will give you the sharpest and clearest image. - Medium/high photo size, JPEG setting (not RAW) – This guarantees your image will be large enough for any type of advertising you require.Note: You can always downsize a photo, but never enlarge it without losing quality.
- Aperture priority between F7.1-11 – This produces the sharpest results, especially when you’re shooting at dusk. Lower aperture means a faster shutter speed, a higher aperture means your shutter will be open longer. If you use a higher aperture your photos will take longer to shoot.
Mid-range apertures will always shoot the clearest results with wide angle lenses. - Focus on the subject once, then turn your focus off on your DSLR lens in between photos. This way your camera won’t try to re-focus between shots, this guarantees there is NO movement between images. This way there won’t be any blurriness due to movement when editing the HDR blend.
The process of HDR editing involves overlapping the photos when the editors blend them. It is important to keep the focus level on all the photos the same for premium results. - Don’t shoot wider than 12mm - Keep shots no wider than 12mm on cropped sensor bodies or approximately 16-18mm on full frame cameras.
If you shoot any wider, it will make your property look larger than it really is. Real estate photography is about presenting the property is an appealing, but also realistic manner. The only time it is ok to use a wider shot is in tight spaces (eg. Pantries, small storage areas) - Use the self-timer – Make sure the self-timer is always switched on. Allow for around 2 to 4 seconds to begin the bracketing sequence. Also, have 1 to 2 seconds set between your bracketed shots, to allow for the flash to re-charge and take the next picture.
- HDR setting or Manual mode - It is best to use your cameras HDR setting or Manual Mode (if it has one), whenever you’re shooting property photos (both interior and exterior shots).
Five bracketed images are best, for clear final results. We recommend you use a self-timer or remote trigger for taking your shots to stop camera movement.
Check out these video’s on how the bracket effectively:
- Shooting From The Inside Out
- Taking Your Own Real Estate Photos - A Sturdy Tripod is a must! Anything that is moving will ruin your shot, HDR photography only works for still subjects. It is always best to ensure pets and people are well out of the way so that extra time isn’t spent editing them out of the photo.
- Flash – Use an external flash. Put it on the lowest setting for a fill flash (A photographic technique used to brighten deep shadow areas).
To get the best-bracketed images we recommend keeping the flash on. Using a plastic flash diffusion dome installed (this fits over your flash and diffuses light evenly), open the flash wide panel and tilt the flash so that it is bouncing off the roof at approximately 45 degrees. Use this setup on your camera each time to take photos this way. - Carry extras – Always make sure you carry extra’s where you can when heading to photograph a property, additional batteries are essential. Even an additional back up camera is handy if you have one.
Here are some additional tips on taking the best real estate shots:
- Blocking out the neighbors subtly
- Blocking out the sun in real estate photography
Presentation is Everything in Real Estate Photography
What Your Shots Should Look Like
The bracketing process shouldn’t be difficult, it is just a matter of having the correct settings and then taking the shots. The outcome will look the same for both the auto HDR function and using a manual mode.
Bracketing is a process of overlaying images over one another, and erasing areas that we don’t need, to create one flawless final image. To get perfect editors
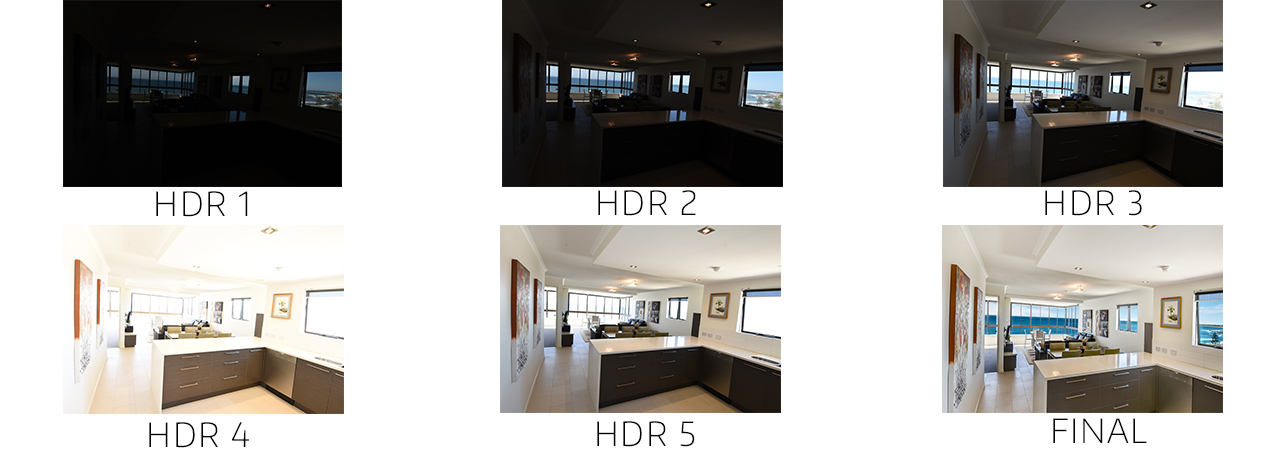
This is what each of your shots should look like:
Rooms with lots of windows are particularly hard one to shoot, because of the bright outdoor area and the dark inside. Via the use of HDR bracketing, we’re able to create an image where all parts of the photo are clear and well exposed.

- HDR 1 - Outside is the clearest part of the image, the indoor area is nearly completely dark and barely visible.
- HDR 2 - The outdoor area is a bit clearer, but indoor areas are quite dark.
- HDR 3 - Dark shadows appear, this is the kind of exposure level you get from using standard camera settings.
- HDR 4 & 5 - The shot is overexposed, including the walls. Everything should appear too bright, but you’re capturing key details in the dark areas.
- Final - This is the final image after editing. All the images have been blended together to create a well-balanced photo where you can see the details inside the house and also the view outside.
“The idea of a property photographer is to capture as much of the space as possible, in its most natural light… You want to fit as much into the frame as you can to show the total area, but you never want the space to look any larger than what it actually is – It’s a fine balance to match client expectations” - Brad Filliponi, BoxBrownie.com Director and Property Photographer
The Final Touches – Photo Editing
Nearly all real estate photos have been edited in some way, but the editing process is a whole other skill. It involves hours of going through images and understanding technical software, that can take years to learn how to use well.
Therefore BoxBrownie.com is a handy tool, taking away the hassled of editing your own images by using these simple steps:
- Sign
into : www.boxbrownie.com - On your Dashboard – Click the ‘Use HDR Bracketing’ box. This can be found just above all the editing options.
- Bulk upload the images via the ‘Image Enhancement with HDR Bracketed Images’ tab and follow the prompts. Make sure you input the correct about of final outputs you want (not the number of overall bracketed images).
- Within 24 hours you will receive your completed images back, ready for the client or your listing.
Tip – When shooting multiple listings per day, use a laptop and/or mobile phone to upload photos to www.boxbrownie.com for editing on the go. This is handy especially if you have a few notes to include that you need to pass onto the editing team.
Taking onsite photos is only part of the process, the rest is involved in the editing of the photograph… which is where the magic happens.
If you’re ready to start taking photos, why not check out some of our other great photography tip blogs:
- Brad’s Pre-Photography Check List
- Real Estate Photography Tips for the Untrained Eye
- How To Get Perfect Shots on Sunny Days
- Can I have a Rain Check? Real Estate Photography in the Rain
- How to make a room look larger with real estate photography
