HOW TO CREATE A VIRTUAL HOUSE TOUR
Introduction:
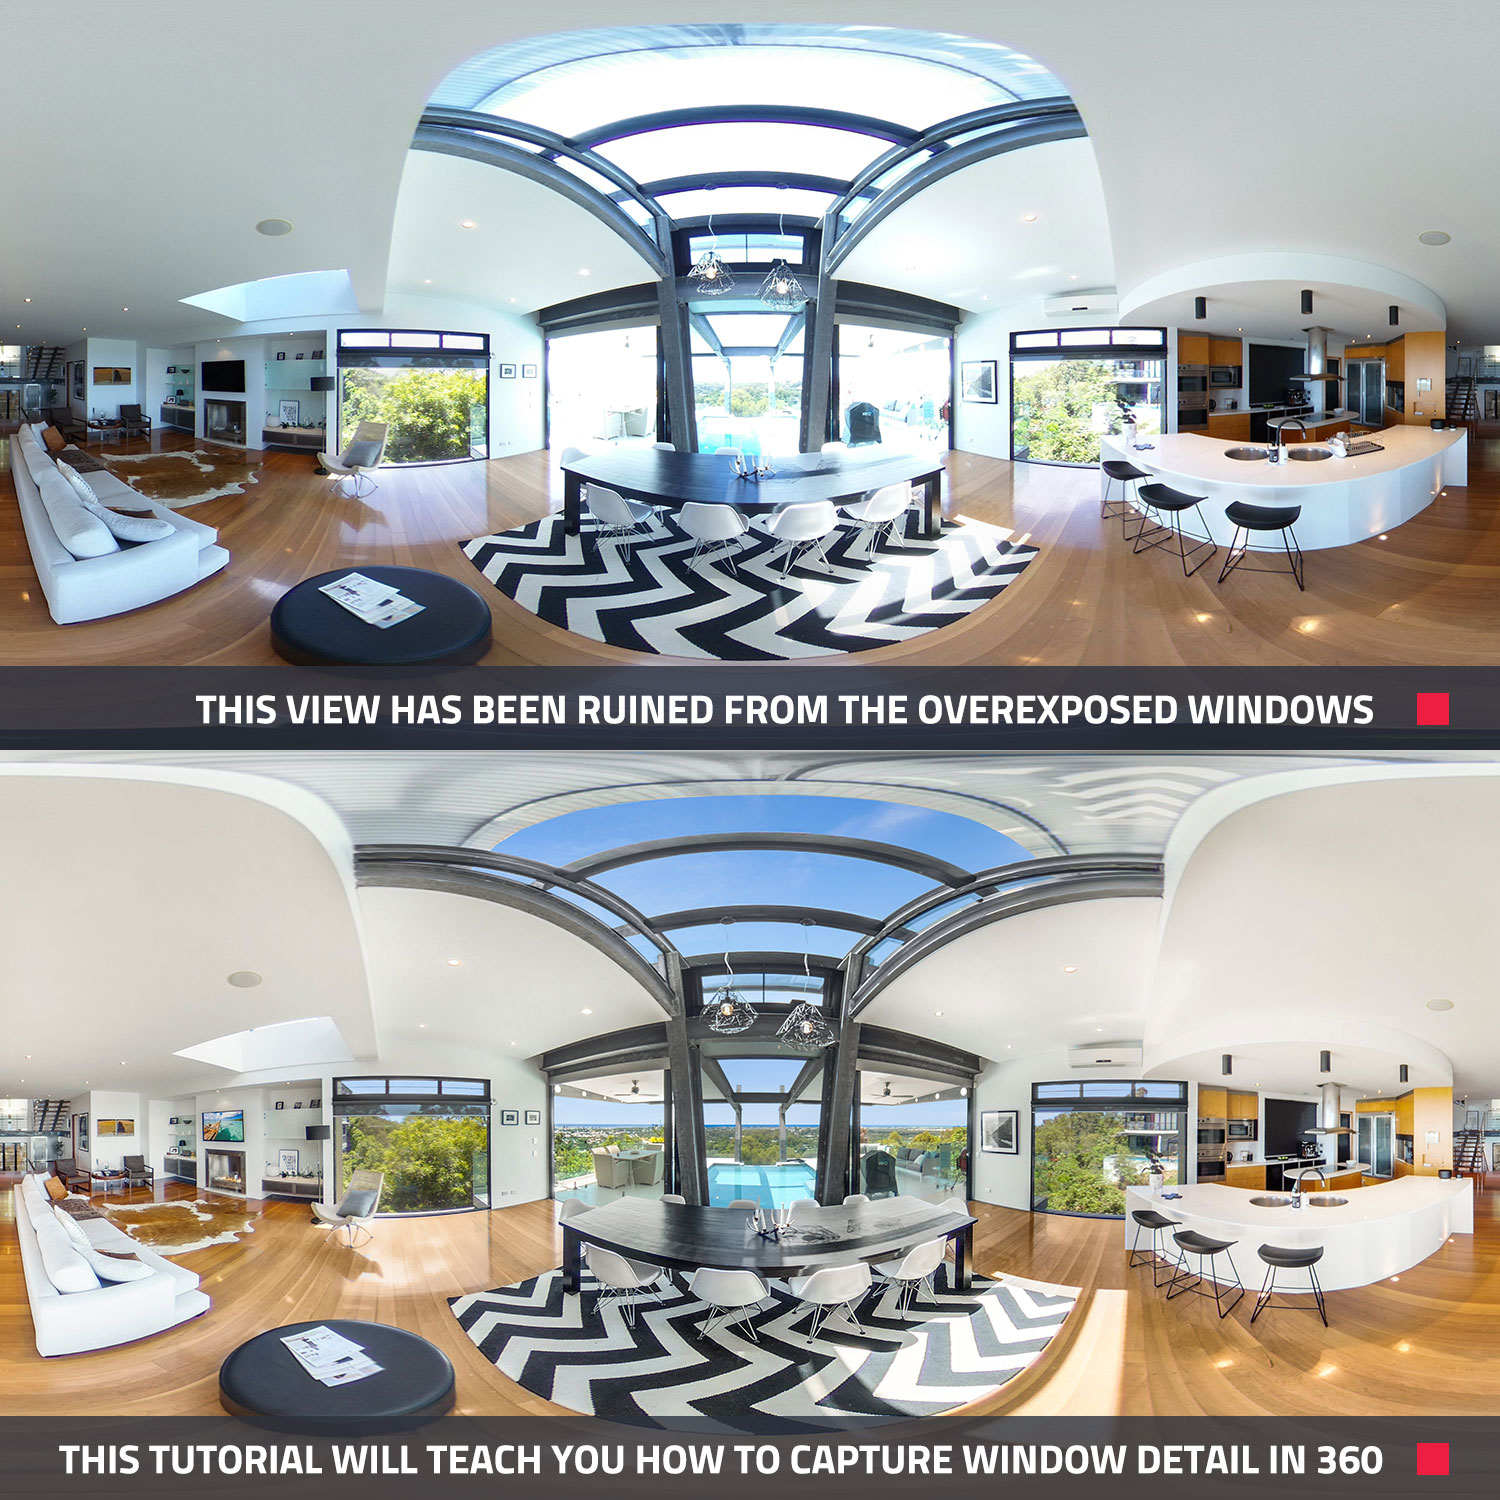
It’s every real estate agent’s dream – a property with a breathtaking view that absolutely blows the socks off your potential buyers. But what happens when you’re creating a 360 virtual tour and all the spectacular window detail is blown out and not clear in the photos?
In this tutorial, we will show you how to create a virtual tour without losing the window detail so you can showcase the property in the most accurate light possible.
 How To Set Up Your 360 Camera
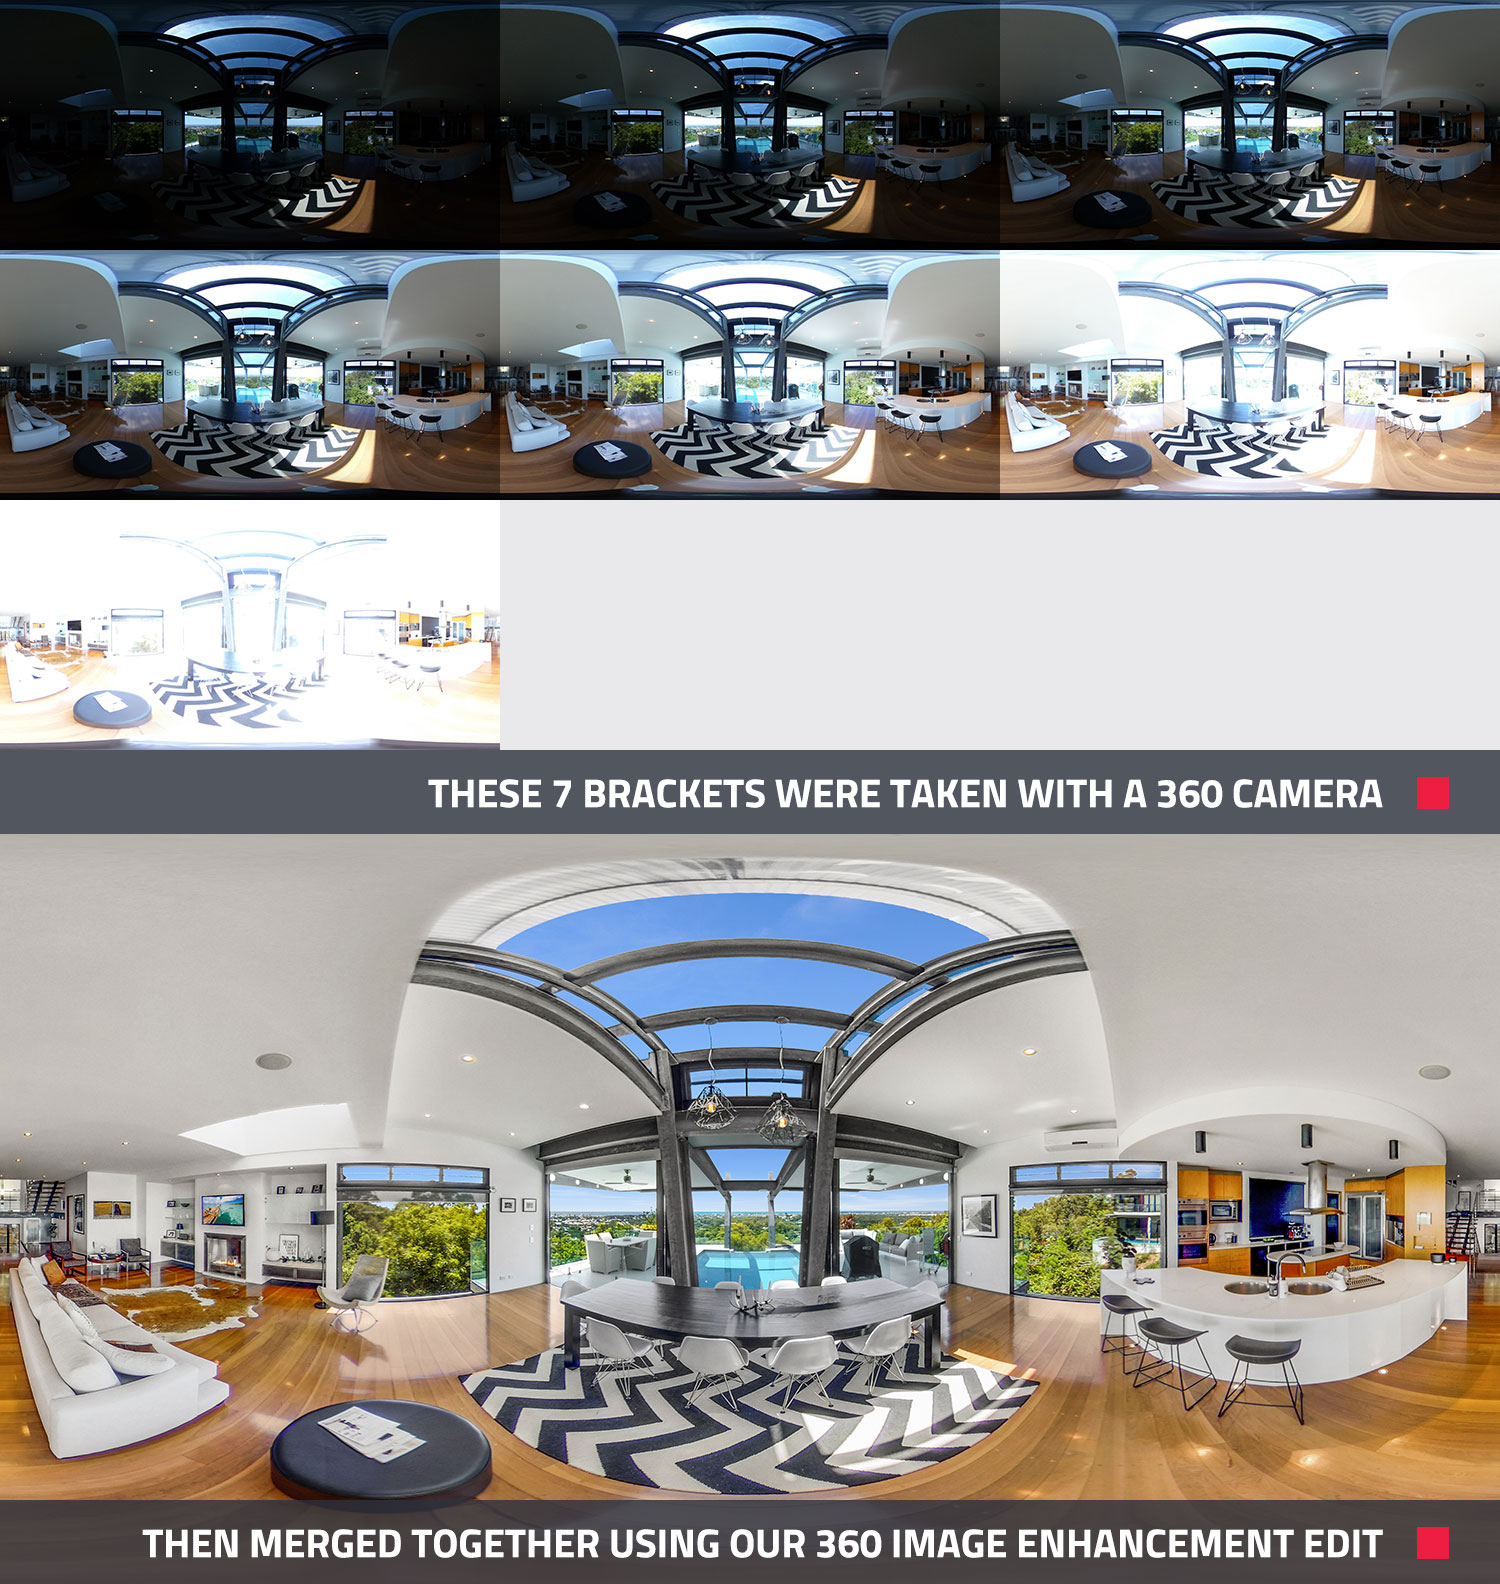
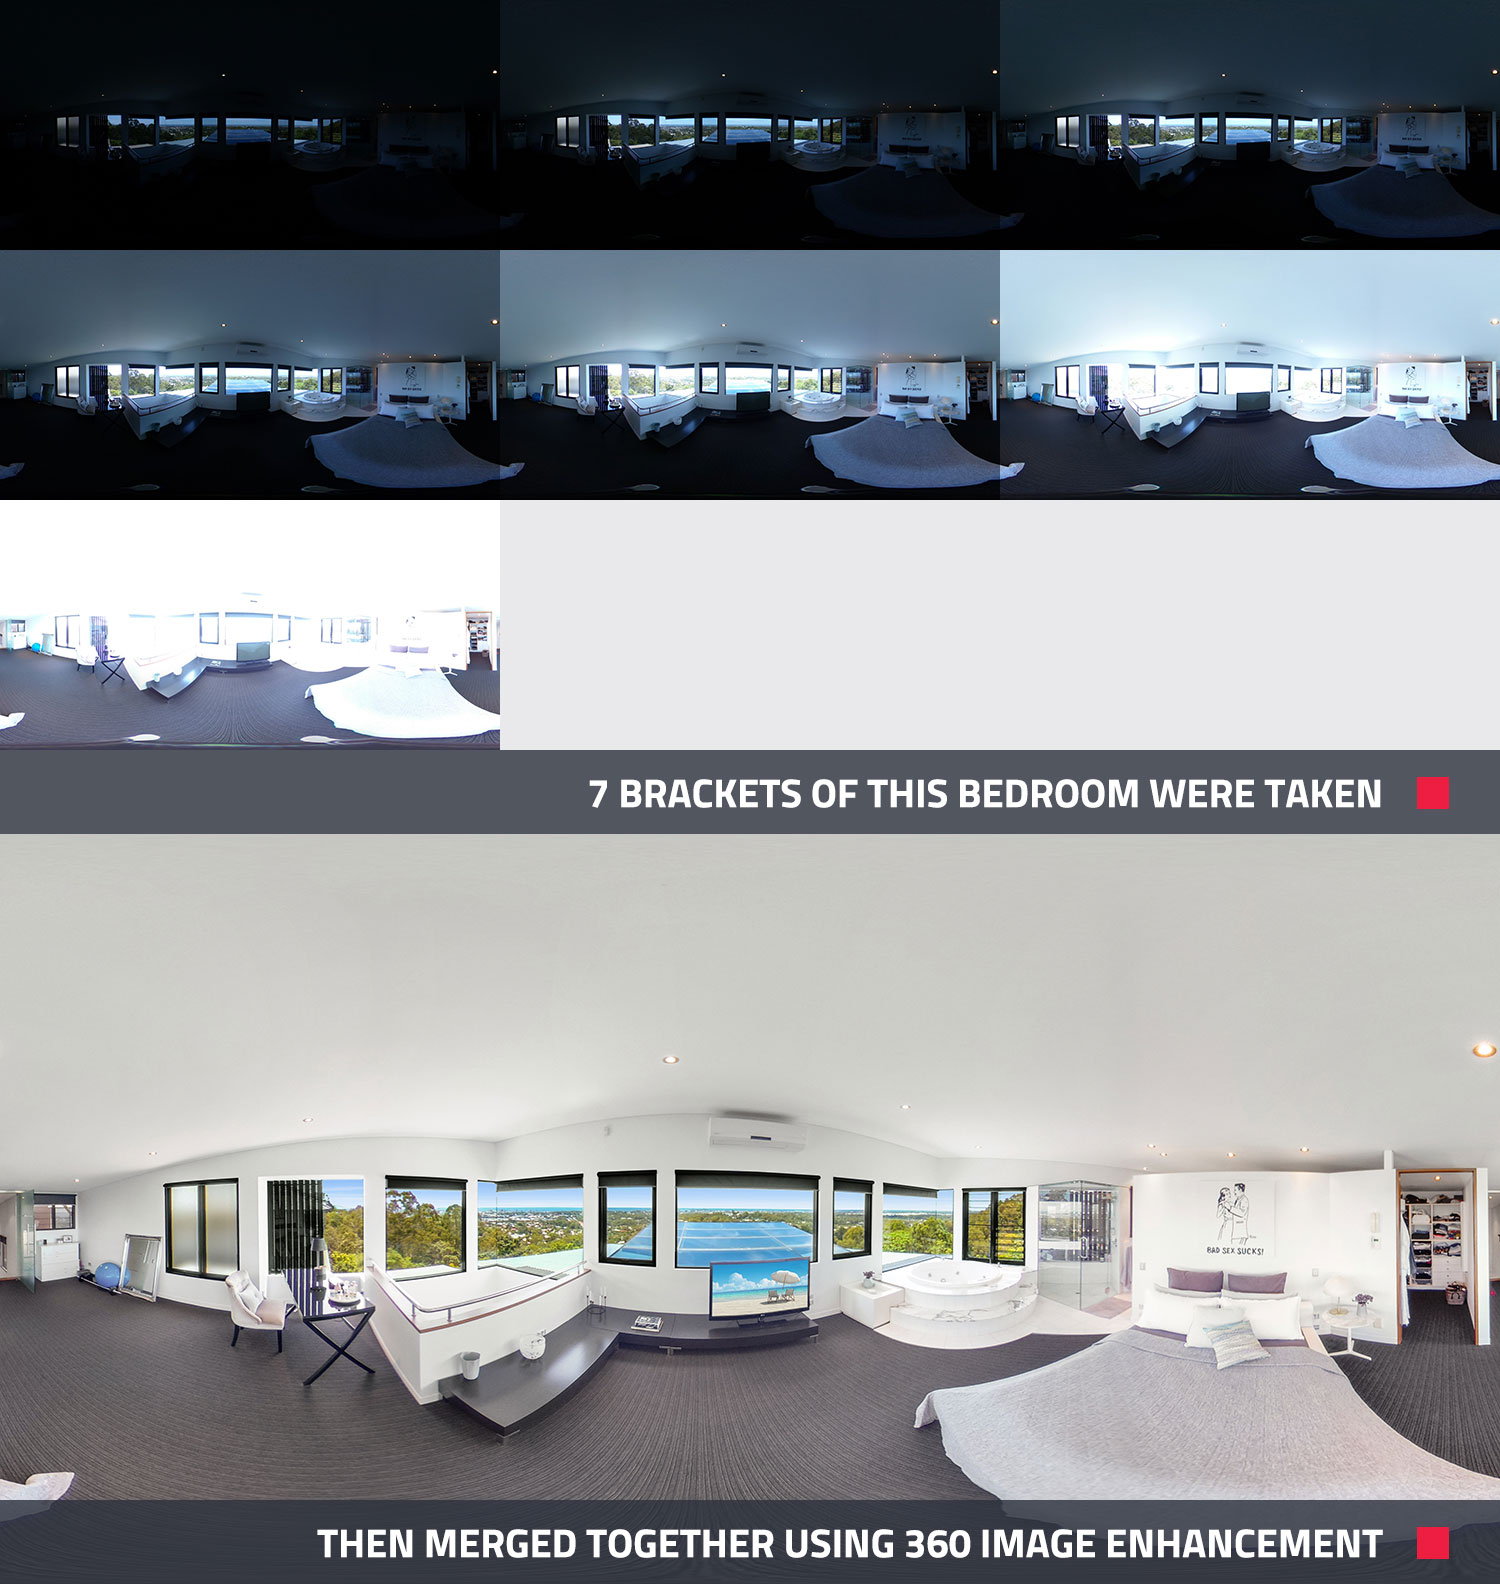
For this tutorial, we will be using the Ricoh Z1 and we will be taking bracketed shots to ensure we can capture the breathtaking outlook without losing both the internal and external focus.
By using the bracketing technique, we will be capturing many different exposures which we can then blend together using our 360 Image Enhancement service. If you’d like to learn more about what bracketed images are, you can check out our previous blog here.
In this case, we will be programming each bracket manually, and below is a list of the setting we will be using.
1) Pair your 360 Ricoh Z1 camera with the Theta app which is available on both the App Store and Google Play.
2) Select the “cog” icon in the top right-hand corner
3) Set the Shooting Method to “Multi Bracket”
4) Set the Self-timer to “10sec”
5) Set the File Format to “JPEG”
6) Next, your image size should be set to “670x3360” (or the highest number possible on your device). Please note, this can’t be changed in multi-bracket mode.
7) Once you have adjusted these settings simply select “Done” in the top right-hand corner
8) Then, click the “+” button to set your first bracket
9) Set the Aperture to 5.6, Shutter Speed to 1/3200, ISO to 100 and WB to 5600K then simply select “Done”
10) You can then repeat steps 8 and 9 so you finish with 7 brackets at the following shutter speeds
Shutter Speeds:
• 1/3200
• 1/1250
• 1/640
• 1/320
• 1/160
• 1/50
• 1/13
11) Now each time you take a photo it will shoot 7 photos automatically at the different exposures that you have programmed here.
It’s important to note when taking your brackets, some of the images will likely be completely over-exposed. This is normal and the reason for this is we have tried here to create a setting that will capture enough brackets when shooting in almost any environment. This includes a really bright sunny day right through to a dark basement. Unfortunately, the Ricoh Z1 doesn’t use a light meter when bracketing so it’s up to us to try and guess the exposures that will allow us to capture the property in full detail.
 Shooting Brackets With Your 360 Camera
Now that your camera is all set up and configured, it will automatically capture 7 shots each time. Once you are ready to begin shooting, you simply need to select the shutter next to the camera and hide so you are not captured in the shot. The Wi-Fi range on the app may not be fantastic so try and find a hiding spot not too far away from the camera itself when taking the shots.
As the camera captures the images, be sure to check the results via the app on your phone to ensure all the spectacular detail outside the window is being captured.
Don’t panic if it takes you a few tries to get the exact settings required to shoot a property on your 360 camera. This is completely normal and once you have the configuration correct, it’s easy and fast.
If possible, try and shoot the home at midday which will ensure the sun is overhead rather than shining directly into the camera. This is even more important when capturing outdoor areas to limit solar flares on the camera lens.
As with most real estate photography, always have the blinds open, turn all the internal lights on, keep the camera as close to eye level as possible and ensure the home has been prepared properly prior to starting the shoot. If you’d like to learn more about preparing a property for the shoot, you can download our free Pre-Photography Checklist.
It’s always best to remove any unnecessary items from the room but if this isn’t possible, we offer Item Removal and Virtual Staging for 360 images.
 Conclusion
Capturing professional 360 images doesn’t have to be hard or time-consuming. By using these bracketing techniques, you can ensure your virtual tours stand out from the crowd and showcase the property in the best light every single time.
If you’d like to get started on creating your own real estate virtual tour or if you have any questions, visit us today or chat to the friendly team at BoxBrownie.com.
RELATED ARTICLES

Discover seven powerful ways one simple edit can turn dull property photos into eye-catching listings. From brighter skies to greener lawns, Image Enhancement isn’t just a nice touch — it’s essential.
READ MORE
Want to learn how to take amazing real estate photos that attract more buyers? Well you’ve come to the right place! In this article, world class real estate photographer Brad Filliponi shares some of his tips and tricks on how to make your property images stand out.
READ MORE
In this blog, we put the two latest market-leading smartphones head-to-head when it comes to real estate photography. Who will come out on top? The Apple iPhone 12 or the Samsung GS20? Check out this blog to see which smartphone we recommend when shooting your latest listing.
READ MORE
Throughout this blog, we are going to let you in on a fantastic real estate photography hack... the iPhone 11's new wide-angle lens! This latest technology will allow real estate agents and property managers to shoot wide on their phones just like a DSLR camera with a wide-angle lens.
READ MORE
Explore seven essential tips to capture an impressive real estate hero shot. From perfect timing and lighting to staging and post-editing, implement these strategies to make a lasting impression on house hunters and close more deals.
READ MORE
Elevate your real estate game with Virtual Staging using your iPhone and the SnapSnapSnap app. Brad, our co-founder and photography pro, shares his top tips for setting up, capturing, and editing stunning visuals that will make your listings irresistible to buyers.
READ MORE